Do you want to give donors an option to leave a message with their donation?
This Donor Comments feature lets you do that with just a few clicks. Once enabled, donor comments can help build community engagement and transparency by giving donors a voice to share their support.
This guide will walk you through the process of enabling and managing donor comments on your donation campaigns.
Table of Contents
Enabling Donor Comments
To allow donor comments on your campaigns, go to the Charitable » Settings page. Here, open the Donors tab and then choose Donor Comments from the submenu.
In this settings page, you’ll see “Enable Donor Comments” with a toggle button next to it. Click this button to enable donor comments feature in the Charitable plugin.
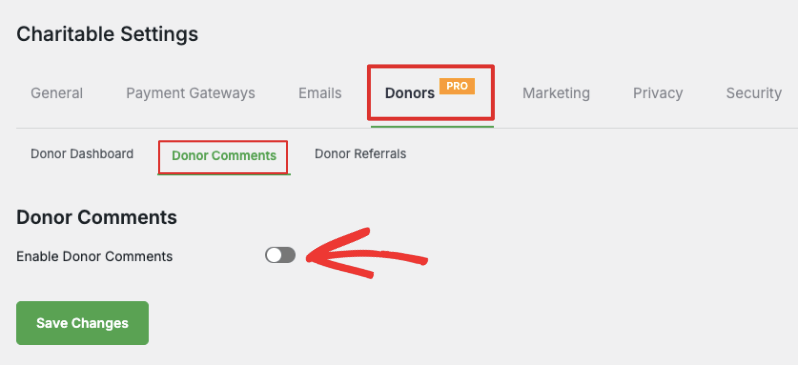
Make sure you hit the ‘Save Changes’ button to store your changes.
Configure Donor Comments Settings
When you enable donor comments, new settings will appear on the same page. There are two options here: Show donor comments and comment instructions.
Show Donor Comments in Campaign
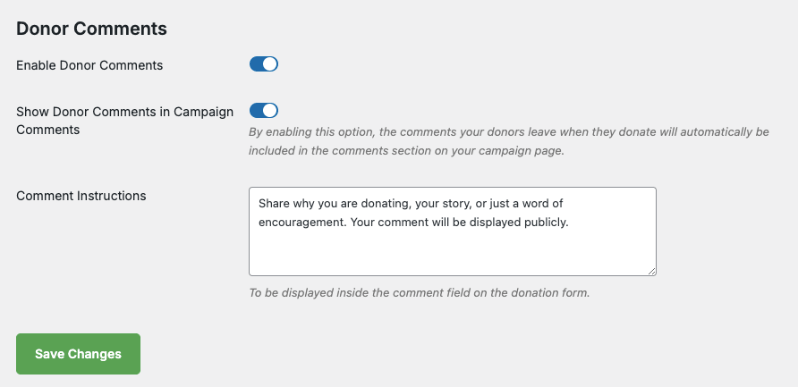
You can show or hide donor comments on Campaign Pages.
- Hide: If you choose to hide donor comments, donors can leave messages but only you and your team will be able to view these comments in the donor management system. The donor can view their comments inside their own donor dashboard (if you’ve enabled it).
- Show: If you choose to show comments, then comments will be publicly viewable. So anyone who can view your campaign page, can also view comments from donors.
Add Comment Instructions
Below this, there is a field called ‘Comment Instruction’. You can enter custom instructions that will appear to your donors inside the comment field in the donation form.
A default message has already been entered for you, but you can edit this as per your needs.
Hit the ‘Save Changes’ button to store your changes.
Now you’ve enabled and configured the donor comments feature on your website. Next, Charitable lets you enable/disable it on individual campaigns that you create. We’ll learn how to do that next.
Important Note: Charitable gives you the flexibility to choose which campaigns can have comments. For this reason, the plugin does not automatically enable the comments section on all campaigns. You need to switch on comments inside the settings of individual campaigns.
Enable Comments in Campaign
Head over to Charitable » Campaigns. Here, you can create a new campaign or edit an existing one.
Inside the campaign builder, in the left menu, choose the Settings » General Settings tab.
On this page, you’ll see a toggle button to enable Donor Comments for this campaign. Click the button to enable comments for this campaign.
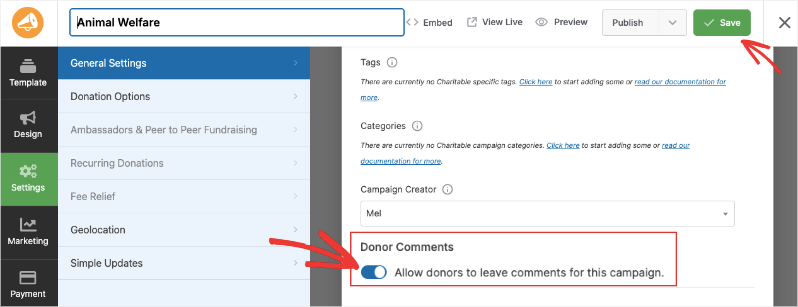
Now you can save and publish the campaign.
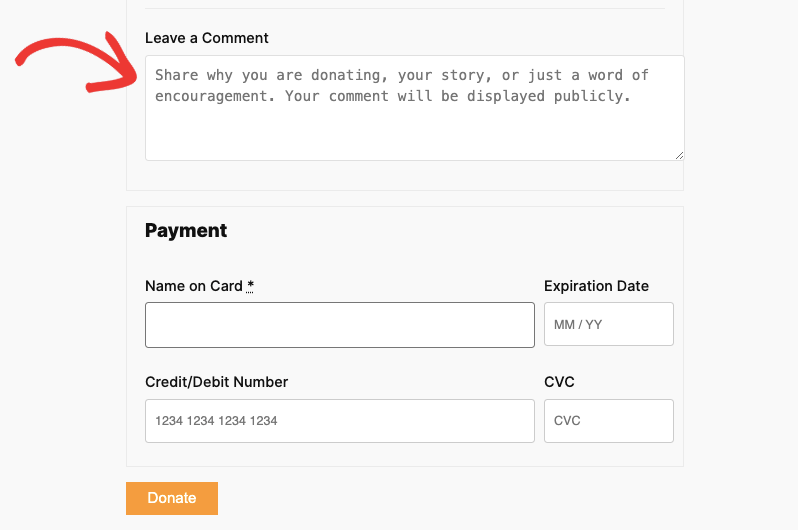
When a donor chooses to make a contribution, they will see an option to Leave a Comment in the donation form.
Here is an example of that:
Displaying Comments Section in Your Campaign
To display the donor comments in your campaign for the public to view, in the campaign builder, go to the Design tab. Scroll to the Pro section in the left panel.
Select the Donor Comments field and drag and drop into your campaign where you would like it to appear.
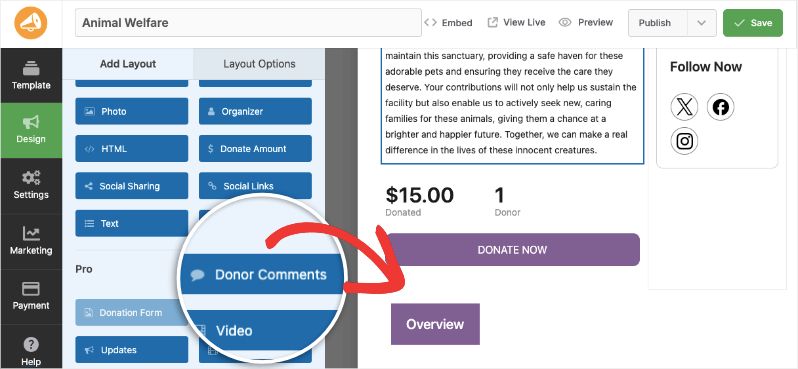
When you save your campaign, the comments section will appear in the campaign.
Managing Comments
Charitable Comments can be managed through the default WordPress Comments page as well as inside the Charitable dashboard.
Managing Donor Comments in WordPress
In the left menu of your WordPress menu, open the Comments page. You’ll see a list of all comments donors have left. You can see the donor name, comment text, the campaign, and the date.
Here, you can approve, reject, edit or reply to comments directly from the WordPress dashboard. You can also send them to spam or trash.
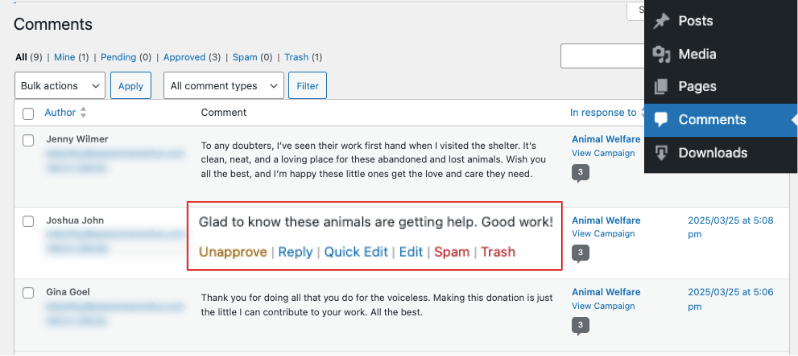
Note: Since donor comments are added as regular comments, they will automatically go through the same Akismet SPAM filtering that regular comments do, if you have Akismet installed.
Managing Donor Comments in Charitable
Inside the Charitable dashboard, go to the Donors tab and edit any donor. Scroll down and you’ll see a section with options to view different tabs: Donations, Campaigns, Comments, Social, Logs, and Notes.
Under the Comments tab, you can view, edit, and delete all comments left by the donor.

Let Donors View & Manage Their Own Comments
If you want to allow donors to manage their own comments, you need to enable the Donor Dashboard. Follow this guide to Enable and Manage the Donor Dashboard »
Once done, your donors can log into their donor account and view all their donations, manage recurring contributions, view comments, and download their donation receipts.
To view comments, donors can log into their account and open the donor dashboard. They’ll see a Comments tab under which all their comments will appear.
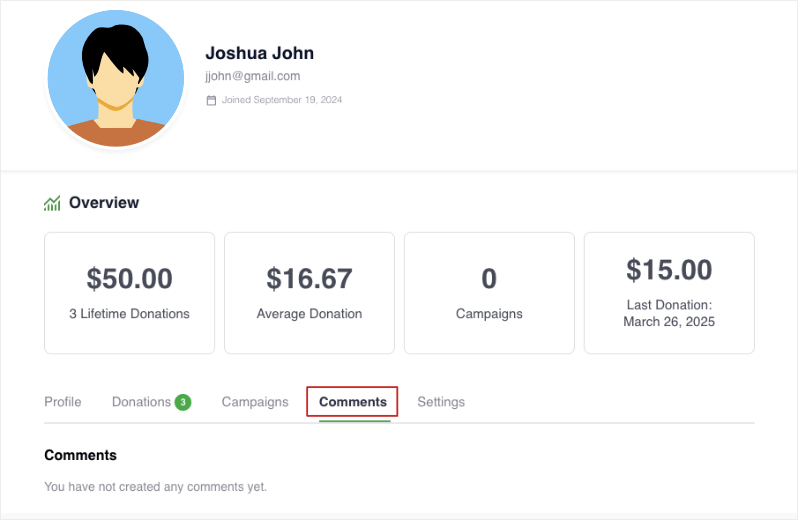
That’s it.You’ve learned how to allow and manage comments in Charitable.
Next, you may also want to learn how to use the Donor Management System and explore Donor Referrals and what they can do for your cause.
