By default, your site will have a single donation receipt page, which donors will automatically be redirected to after they make their donation.
You can use the auto-generated receipt page provided by Charitable out of the box, or you can specify a particular page to be used as your donation receipt page. Check the guide below if you’re not sure how to do this:
But what if you want to use a different receipt page for different campaigns? That isn’t possible out of the box, but thanks to Charitable’s built-in flexibility, it’s possible to achieve this with just two PHP functions.
The Solution
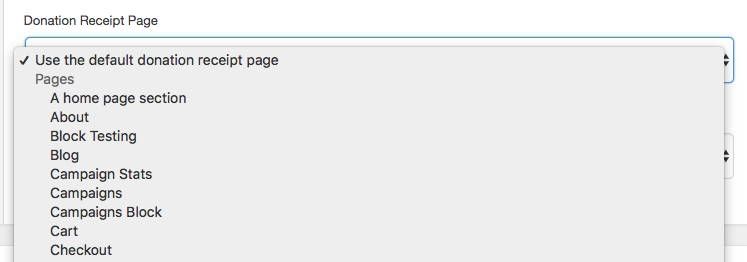
Our solution will add a new field to the campaign editor which allows you to select a static page as the donation receipt page for your campaign. Unless you choose a specific page, it will use the default option, which is whatever is set at Charitable > Settings > General for the “Donation Receipt Page” option.
I will explain the solution below, but if you just want the code, you can download it from Github:
https://github.com/Charitable/Charitable-Custom-Campaign-Receipt-Pages
Step 1: Add our function
As with the last two tutorials, this one starts with a PHP function which will run when the init hook is called within WordPress. init is a hook that happens early on while WordPress is loading, before the page has started rendering.
add_action( 'init', function() {
    // Our code will go in here.
} );
We are using an anonymous function here, which is fine as long as you are on a version of PHP greater than 5.2.
If you’re not sure how to add this to your site, check out our guide:
Step 2: Add the field to the Campaign editor
We can now add our “Donation Receipt Page” setting by registering a new field using the Campaign Fields API.
add_action( 'init', function() {

	/**
	 * Create a new field as an instance of `Charitable_Campaign_Field`.
	 *
	 * See all available arguments at:
	 *
	 * @https://github.com/Charitable/Charitable/blob/ef9a468fbdd6fa83307abe6ac0c38896f625cf45/includes/fields/class-charitable-campaign-field.php
	*/
	$campaign_field = new Charitable_Campaign_Field( 'donation_receipt_page', array(
		'label'      => 'Donation Receipt Page',
		'data_type'  => 'meta',
		'admin_form' => array(
			'type'     => 'select',
			'required' => false,
			'options'  => array(
				'default' => 'Use the default donation receipt page',
				'pages'   => array(
					'options' => charitable_get_pages_options(),
					'label'   => 'Pages',
				),
			),
			'default'  => 'default',
			'section'  => 'campaign-donation-options',
		),
                'show_in_export' => true,
	) );

	/**
	 * Now, we register our new field.
	 */
	charitable()->campaign_fields()->register_field( $campaign_field );

} );
This is the same approach that we used in the previous two tutorials, so if you read those this will look quite familiar to you. One new bit is how the field’s admin_form setting is set up:
'admin_form' => array(
	'type'     => 'select',
	'required' => false,
	'options'  => array(
		'default' => 'Use the default donation receipt page',
		'pages'   => array(
			'options' => charitable_get_pages_options(),
			'label'   => 'Pages',
		),
	),
	'default'  => 'default',
	'section'  => 'campaign-donation-options',
),
The type is set to select, which means that a dropdown select field will be used. Select fields require a set of options, which are passed as an array. Our array includes first of all a default choice, followed by a list of pages, retrieved using the charitable_get_pages_options() function. If you’re familiar with HTML, the way this is structured means that the options array inside pages creates an optgroup element, with label set as the label.

Step 3: Override the default donation receipt page
Within Charitable, the donation receipt URL for a particular donation is retrieved like this:
charitable_get_permalink( 'donation_receipt_page', array(
    'donation_id' => $donation_id,
) );
This function in turn uses the Endpoint API, which provides a structured way to deal with important endpoints within Charitable, such as campaigns, donation pages, the login page and the donation receipt page.
What is important for our case is that the returned permalink can be filtered. In the case of the donation receipt page, the filter to use is charitable_permalink_donation_receipt_page. It provides two parameters:
$default– The default permalink to be used. We will fall back to this if the campaign has not set a custom receipt page, or if it’s using the default.$args– An array containing the donation ID.
Step 3a: Create the outline of the callback function
First of all, let’s see what the structure of our callback function will look like:
/**
 * Filter the page to redirect the donor to after making their donation.
 *
 * @param  string $default The endpoint's URL.
 * @param  array  $args    Mixed set of arguments.
 * @return string
 */
add_filter( 'charitable_permalink_donation_receipt_page', function( $default, $args ) {

   // Code goes here.

}, 10, 2 } );
As you can see, we are defining an anonymous function that is hooked into the charitable_permalink_donation_receipt_page filter. Importantly, our last line sets the callback function to operate with priority 10 (the default) and receive 2 parameters.
Step 3b: Get the campaign for the donation receipt
The $args parameter will include a donation_id property. We use this to get a Charitable_Donation object, and in turn use that to get the Charitable_Campaign object:
/**
 * Get the donation object.
 */
$donation_id = isset( $args['donation_id'] ) ? $args['donation_id'] : get_the_ID();
$donation    = charitable_get_donation( $donation_id );

/**
 * Get the campaign that received the donation.
 */
$campaign_id = current( $donation->get_campaign_donations() )->campaign_id;
$campaign    = charitable_get_campaign( $campaign_id );
Step 3c: Get the campaign’s donation receipt page
Now that we have a Charitable_Campaign object, we can get the donation receipt page setting for the campaign with the get() method:
/**
 * Get the campaign's donation receipt page.
 */
$receipt_page = $campaign->get( 'donation_receipt_page' );
Step 3d: Check whether to return the default receipt URL
Remember that you can set the campaign to use the default receipt. It’s also possible that you haven’t updated your campaign since adding the Donation Receipt Page setting, in which case the $receipt_page variable will be false. If either of these is the case, we will return the $default variable since we don’t have a custom receipt for this campaign:
/**
 * If we haven't set a donation receipt page or we chose
 * the default option, return the default.
 */
if ( ! $receipt_page || 'default' == $receipt_page ) {
    return $default;
}
Step 3e: Return the custom receipt URL
If we’re still around at this point, it means that a custom receipt page is set for this campaign. All that’s left to do is to get the permalink for that page and then append the donation_id to it, as well as donation_receipt. The resulting URL will look like this:
https://mysite.com/my-custom-receipt-page/?donation_id=123&donation_receipt=1
Here’s how we do that:
/**
 * Get the permalink for the receipt page and then append
 * the donation_id and donation_receipt arguments to it.
 */
$receipt_page_url = get_permalink( $receipt_page );
$receipt_page_url = add_query_arg(
	array(
		'donation_id'      => $donation_id,
		'donation_receipt' => 1,
	),
	$receipt_page_url
);

/**
 * Return the escaped URL.
 */
return esc_url_raw( $receipt_page_url );
get_permalink is a core WordPress plugin used to get the URL for a particular page or post. We use that as the basis for our URL, and then append the required query arguments to it with add_query_arg. Finally, we return it as an escaped value with esc_url_raw.
Extra Step: Set up your custom receipt page
This solution allows you to use any page as a donation receipt page. Chances are, you would like to show information about the donation to the donor when they land on the receipt. To include this, you can use the [donation_receipt] shortcode; it will show the dynamic receipt information that is normally shown on Charitable receipts.
Bonus ideas for customizing the donation receipt page
We’ve seen here how to customize the donation receipt page on a per-campaign basis. But what if you would like to use a different donation receipt page based on a different factor?
Over on our Code Snippets library, we have a couple snippets available that show you how you can use a different donation receipt in other scenarios:
- Use a different donation receipt for recurring donations
- Use a different donation receipt for offline donations (can be adapted for other payment gateways).
Got an idea for another tutorial?
If you have an idea for another tutorial, I’d love to hear it! Leave a comment below or get in touch via our Support page.


Leave a Reply