Looking for a quick, easy, yet secure way to accept PayPal donations online?
Setting up a PayPal account to accept donations doesn’t have to be complicated.
In this guide, I’ll walk you through the process step-by-step so that you can get PayPal up and running in a matter of minutes. My goal is to provide you with clear, actionable instructions that will work regardless of your level of WordPress expertise.
By the end of this tutorial, you’ll have a professional, efficient donation system integrated into your WordPress site.
Let’s begin by exploring the right tool to handle PayPal donations, and then we’ll move on to the practical steps of implementation.
Finding the Right Tool: Why Charitable for PayPal Integration?
When it comes to integrating PayPal donations with WordPress, there are numerous plugins available. In my experience working with various WordPress sites, from small personal blogs to large non-profit organizations, Charitable has consistently delivered excellent results.
Charitable offers native support for PayPal, making the setup process straightforward and reliable. This integration is robust and regularly updated to ensure compatibility with PayPal’s latest features.
Aside from that, here’s why you’ll love Charitable:
- User-Friendly Interface: The plugin provides an intuitive dashboard that’s easy to navigate, even for those new to WordPress. This simplifies the process of setting up and managing donation campaigns.
- Customization Options: Charitable allows you to customize your donation forms to match your website’s design, creating a cohesive user experience for your donors.
- Powerful Features: Beyond basic donations, Charitable supports features like recurring donations, campaign goals, and donor management – all essential for effective fundraising.
- Excellent Documentation and Support: The plugin comes with comprehensive documentation and responsive customer support, which I’ve found invaluable when troubleshooting or exploring advanced features.
- GDPR Compliance: In an era of increasing privacy concerns, Charitable offers tools to help ensure your donation system complies with GDPR regulations.
- Regular Updates: The development team behind Charitable consistently releases updates, ensuring compatibility with the latest versions of WordPress and addressing any security concerns promptly.
- Scalability: Whether you’re running a small personal fundraiser or managing a large non-profit, Charitable can scale to meet your needs without compromising performance.
- Reporting and Analytics: The plugin provides built-in reporting tools that offer insights into your donation patterns and campaign performance.
While there are other plugins that can integrate PayPal donations with WordPress, I’ve chosen to focus on Charitable in this guide due to its balance of functionality, ease of use, and reliability.
That said, I always recommend evaluating your specific needs and potentially trying out a few options before making a final decision. Charitable offers a free version that you can test before committing to the pro version, allowing you to ensure it meets your requirements.
Accepting PayPal Donations in WordPress
Step 1: Installing Charitable
The first step in setting up PayPal donations on your WordPress site is to install and activate the Charitable plugin. Charitable offers both free and premium versions. For basic PayPal donation functionality, the free version is sufficient.
Inside your WordPress dashboard, navigate to Plugins » Add New Plugin, then search for ‘Charitable’ and install and activate the plugin.
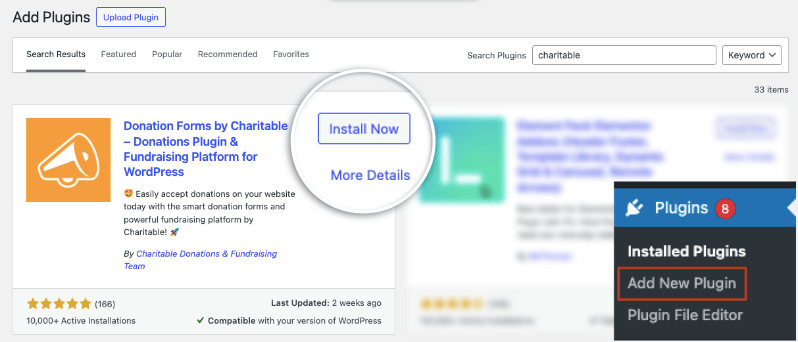
However, if you need advanced features like recurring donations or additional payment gateways, consider upgrading to the pro version. Visit the Charitable site and choose a plan that’s best for you. Then you’ll get a downloadable file to upload to your WordPress site. Go to Plugins » Add New » Upload Plugin and add the plugin file here.

Once activated, you’ll notice a new “Charitable” menu item in your WordPress dashboard’s left sidebar. This is where you’ll manage all your donation-related settings and campaigns.
Step 2: Create Your First Fundraiser Campaign
Now you can get started with creating donation forms and fundraiser campaigns. To create your first fundraiser, head over to the Charitable » Add New tab. This will open up the template library.
You can also create, view, edit, and delete campaigns under the Charitable » Campaigns tab.
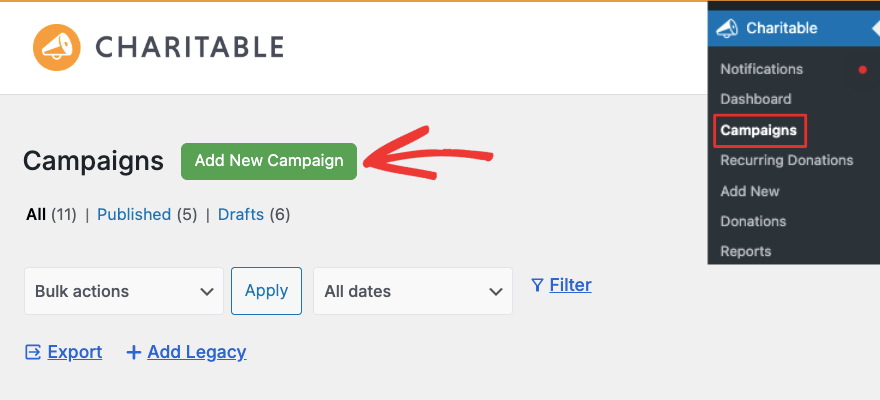
This will open up a new page with templates. At the top, you can enter a name for your campaign to easily identify it later.
Below that, you can browse templates. You’ll notice in the left taskbar that you can filter templates by cause such as Animal/Pets, Organizations, Environmental, Legal, Medical, and so on.
Hover over any template, and you can preview or select it.
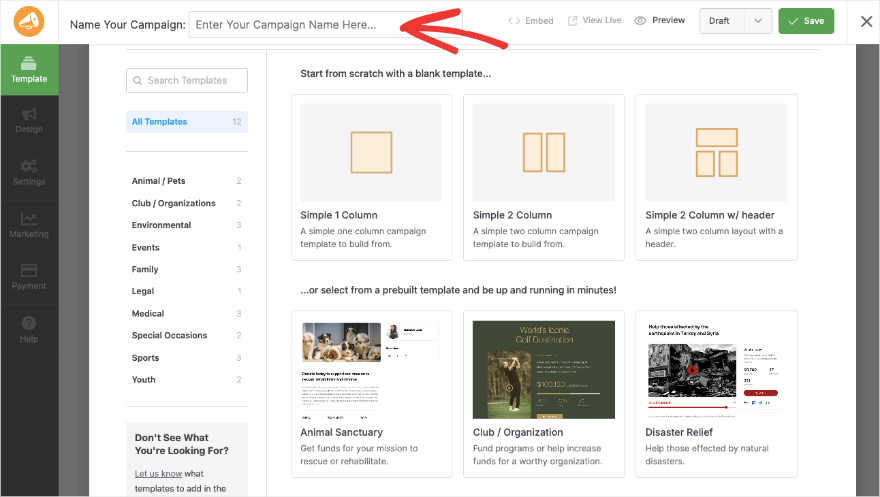
Once you’ve chosen a template, you’ll be taken to the cool campaign builder.
Step 3: Customize Your Fundraiser
This campaign builder is one of the best I’ve seen. It’s so easy to use. There’s zero coding involved.
All you have to do is click buttons, drag and drop your elements, and type in your own text – that’s about it.
You get a visual preview of your campaign to which you’ll make edits. So you can see exactly how it would look on your live site.
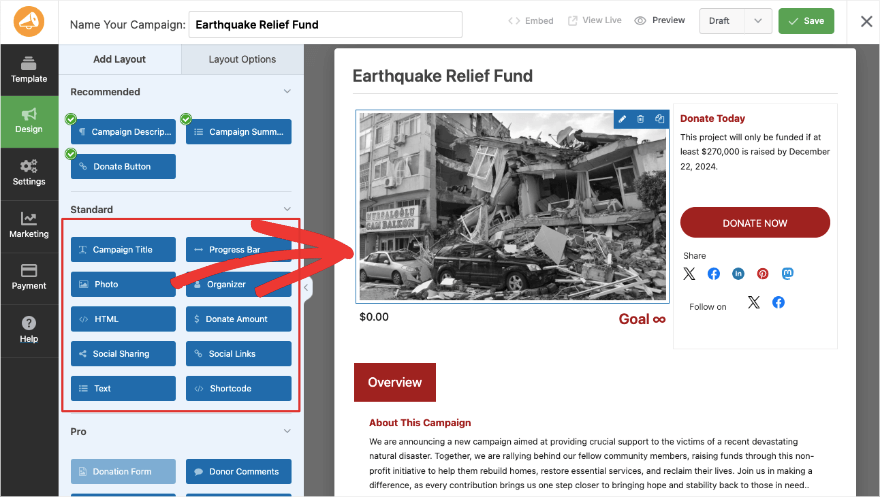
The left taskbar has all the elements and field settings, the right shows you the preview. To add a new field, simply click on the one you want from the left, drag it to where you want it to appear in your campaign, and drop it.
If you see a field with a green tick, that means it’s already added to your fundraiser. You can add blocks like titles, progress bars, photos, organizer profiles, donation amounts, social sharing buttons, social links, and more.
If you’re on the premium plans, then you can also add donation comments, videos, a donation wall, team details, and more.
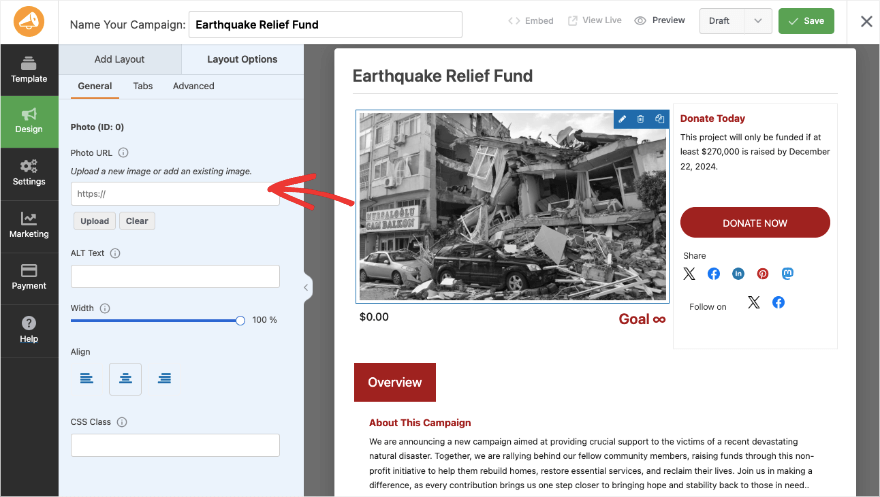
To edit any field, click on it in the preview. You’ll see editing options open up on the left. So for instance, if you click on the image, you get an option to upload your own to replace the placeholder image.
You can tweak the width, alignment, and even add ALT text to optimize it for SEO.
Like this, you can explore the builder on your own. It’s built to be user-friendly so that even beginners can navigate it easily.
Click the Save button at the top right corner of your screen to save your progress as you move along.
Step 4: Customizing Campaign Settings
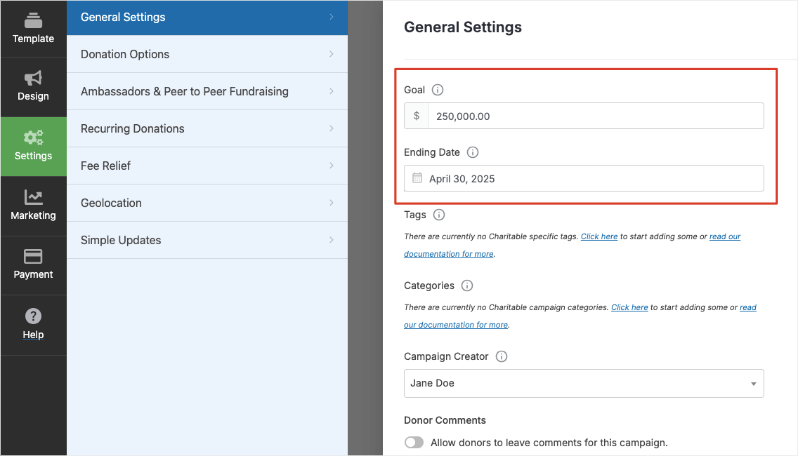
Now in the far left menu, switch from the Design tab to the Settings tab. This will open up options where you can add your campaign goals and ending dates. I love this builder so much because you’ll see that every field has an ‘i’ icon next to it that gives you details on what each one can be used for.
Let’s move on to the next tab – Donation Options. Here, you can add preset donation amounts. This helps guide donors and can often increase the average donation size.
Consider your audience and campaign goals when setting these amounts. If you’re targeting small, frequent donations, consider starting lower (e.g., $5). For larger fundraising campaigns, you might start higher.
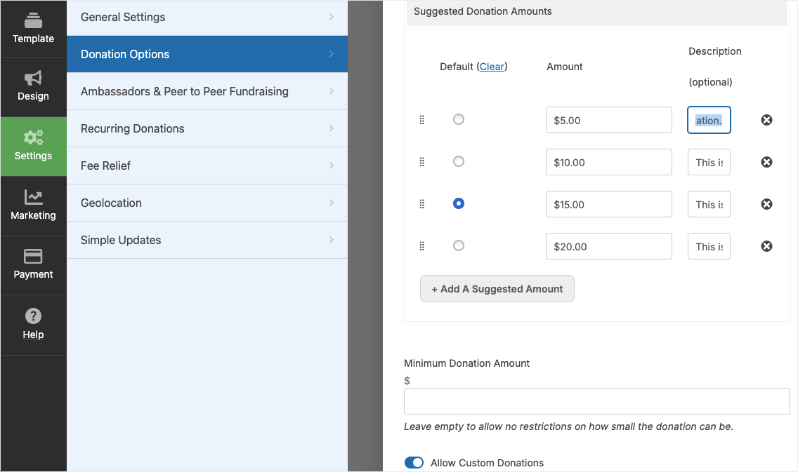
You can set minimum donation amounts and also allow donors to enter their own amount by allowing custom donations.
Now it’s time to enable PayPal!
Step 5: Configure PayPal
Your campaign is set up, configured and ready to go live! All that’s left to do is configure the PayPal payment gateway. This is super easy with Charitable.
The PayPal integration is built-in to PayPal so you don’t have to enable any addon. Simply go to the Payment tab in the left taskbar. Here, open PayPal and click on ‘Go To Payment Gateway Settings’.
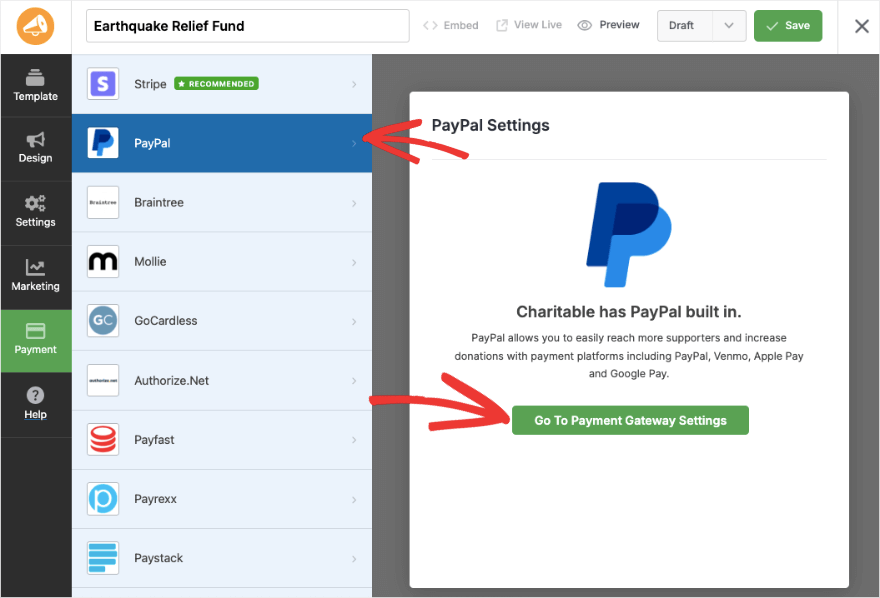
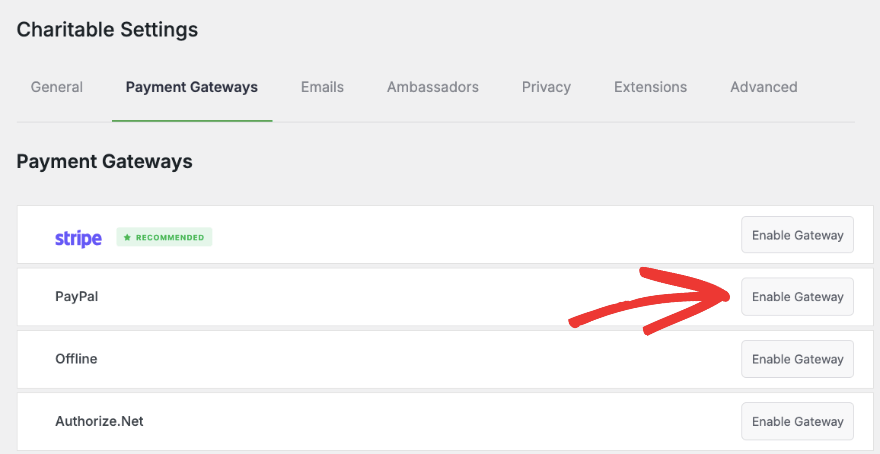
This will open up a new tab with the Payment Gateway settings. Here you can click on the button ‘Enable Gateway’ next to PayPal.
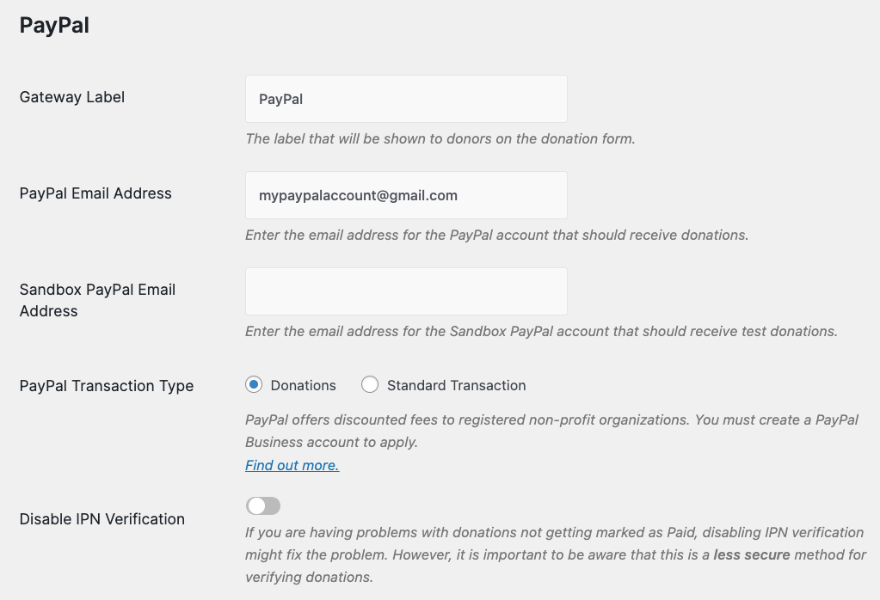
Once enabled, you’ll see a new page with options to add your PayPal email address and the transaction type.
You’ll notice that there are ‘Sandbox’ options. Sandbox PayPal is a testing environment provided by PayPal that simulates the real payment system. It lets you test PayPal integrations without using real money or affecting actual PayPal accounts.
Below this, you’ll see API settings. This is important. You need to enter these credentials in order to get refunds, cancel subscriptions, and so on.
Charitable gives you links to easily generate or find your API keys. Follow these links, fetch your details, and paste them into the fields provided.
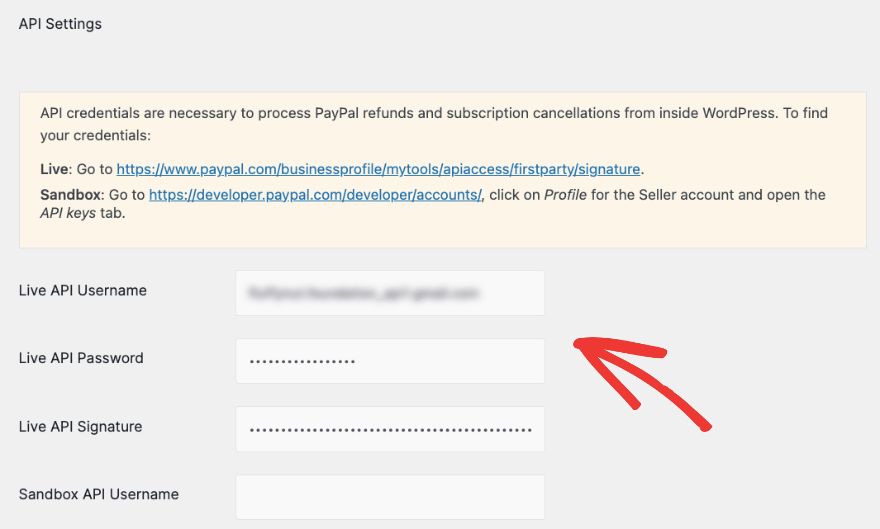
Make sure you add your Live API username, password, and signature. That’s it. Save your settings and keep this tab open for the next step.
Step 6: Set Up Automated Donation Receipts
When you’re receiving donations, you’ll likely need to send donation receipts to your donors to confirm their payment as well as for your tax purposes.
Charitable lets you set up automated emails that will go out immediately after a donation is made.
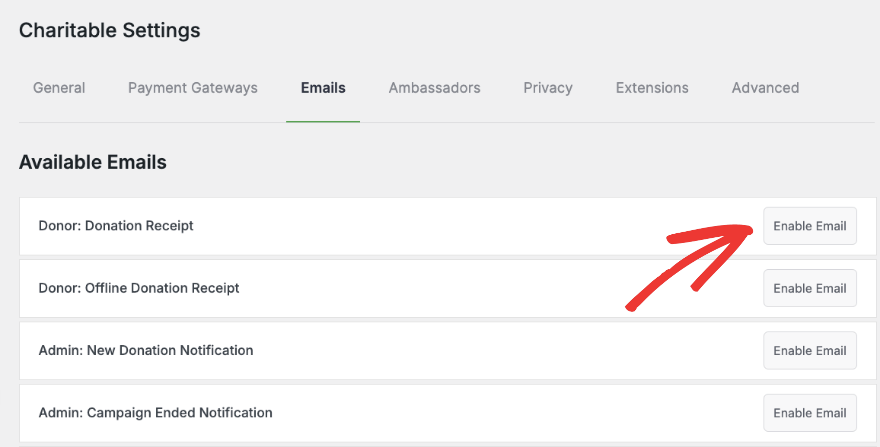
In the same Charitable » Settings tab, you can switch to Emails in the top menu. Here, you’ll see premade emails for donation receipts, donation notifications, and more.
Simply click the ‘Enable Email’ button here.
Now you’ll see an ‘Email Settings’ button appear.

This lets you customize the email subject line, headline, and body. You’ll notice that the email contains words inside square brackets. These are smart tags that automatically fetch information from fields filled out by the donor in the donation form.
So for instance, [Charitable_email show=donor_first_name] will fetch the name entered by the donor in the donation form.
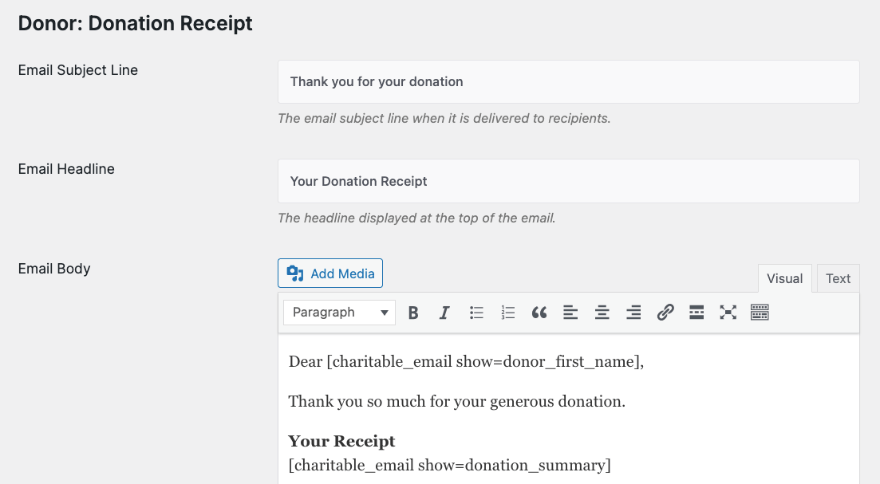
This ensures that the email is personalized to their name, donation amount, and other details. You set this up once and it will run on its own.
Make sure you save your settings.
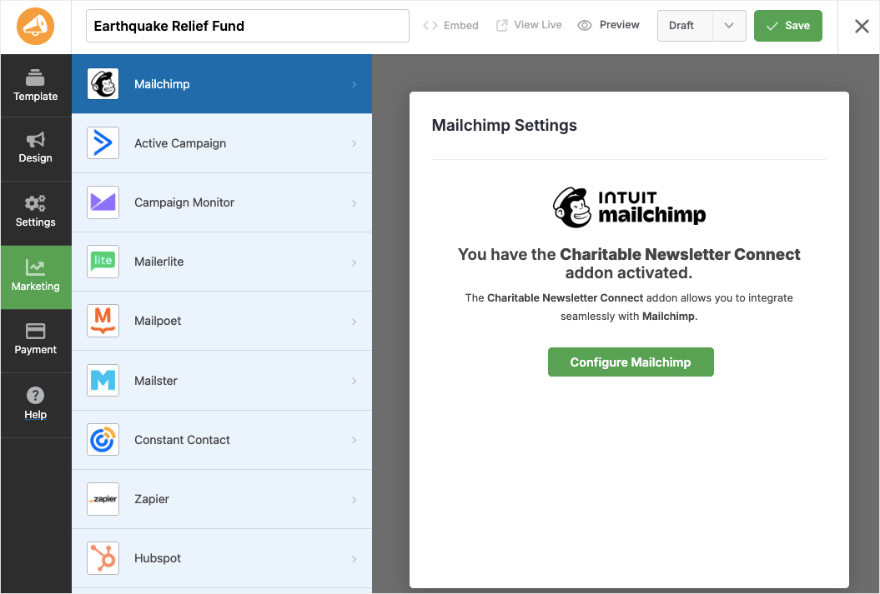
If you have an existing email marketing account such as Constant Contact or Mailchimp, you can connect it to your donation campaigns. The integration is simple. All you have to do is enter your email account details or API keys and it will be connected.
Step 7: Publish Your Campaign
Charitable makes it so easy to publish your campaign and add it to your website to start collecting PayPal donations right away.
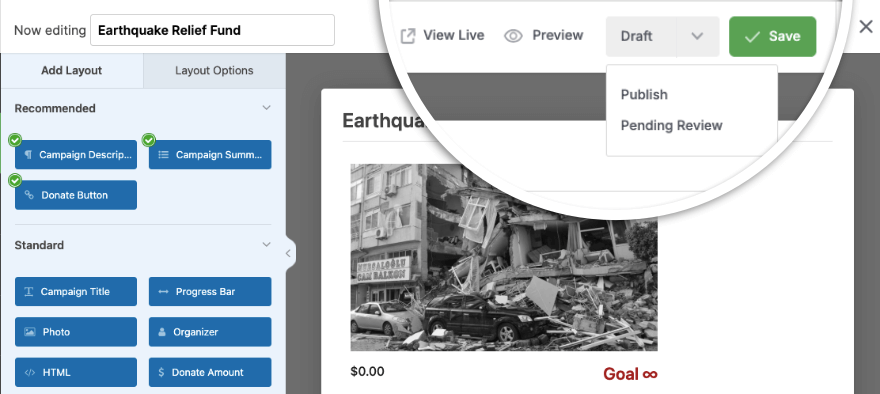
At the top right corner of the builder, you’ll see all the save and publish options. First, I recommend previewing your campaign on your live site to make sure it looks good. You can make any tweaks necessary.
Then, you’ll see a drop-down menu to set the status of your campaign – draft, pending review, and publish.
Set this to Publish and save your campaign.
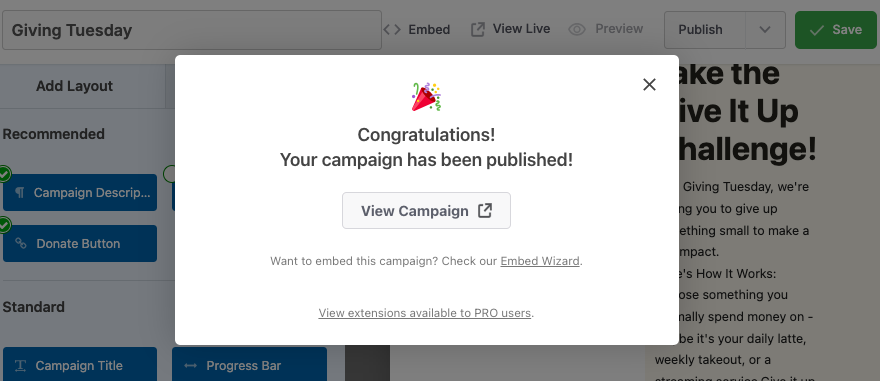
You’ll see a congratulations message that your campaign was published. You can view the campaign to see how it looks and functions on your live site.
Now you need to add it to a specific page or post. Head over to Pages » Add New. Inside the block editor, add a new block and search for Charitable. This block will add the Charitable widget to your page along with a dropdown menu from which you can choose your campaign.
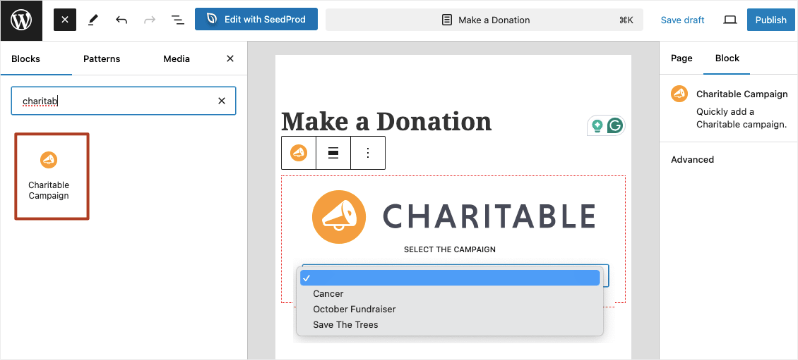
Choose the campaign you want and then publish your page. You can use the same process for creating or editing WordPress posts as well.
That’s all! You should see a campaign like this on the page or post where you’ve added it.

Now you’re all set to accept PayPal Donations on your site. I hope you found this guide helpful. You may also want to check out our tutorial on How to Add a Fundraising Thermometer in WordPress.
Once you start receiving donations, you can get insights into your fundraising efforts with detailed Fundraising Reports on donation trends, campaign performance, and donor behavior.
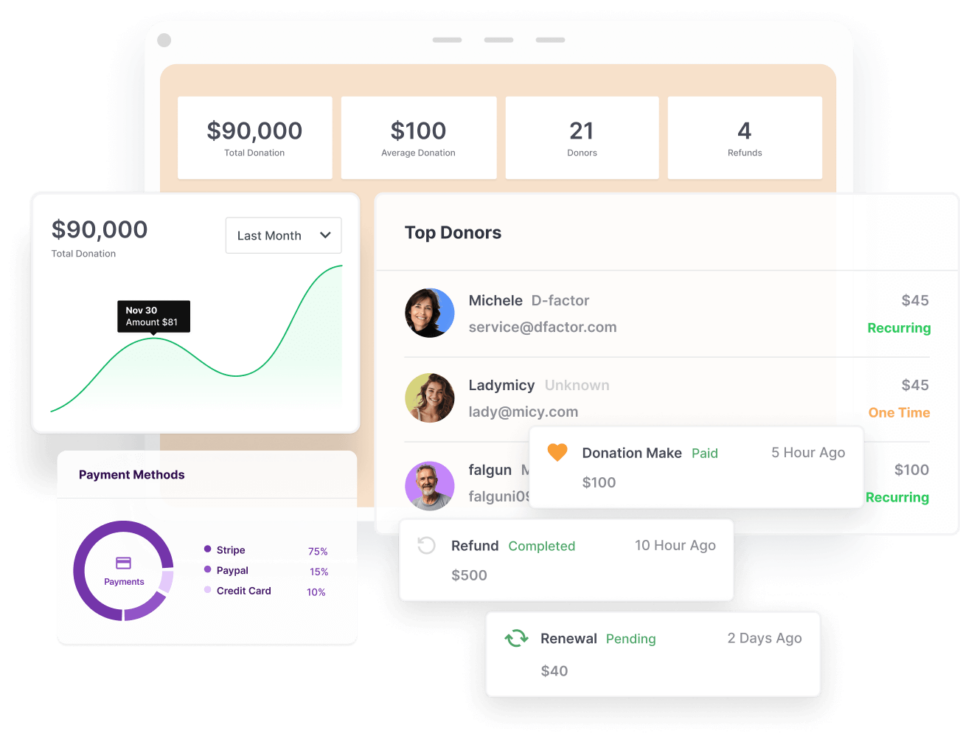
With Charitable, you can create and manage multiple fundraising campaigns simultaneously. This is perfect for organizations running different initiatives or for seasonal fundraising efforts. Each campaign can have its own goal, description, and even custom fields.
For sustaining long-term support, you can set up recurring donation options. Donors can choose to give monthly, quarterly, or annually, providing a steady stream of income for your cause.
With the peer-to-peer fundraising feature, you can enable supporters to create their own fundraising pages, expanding your reach and engaging your community more deeply.
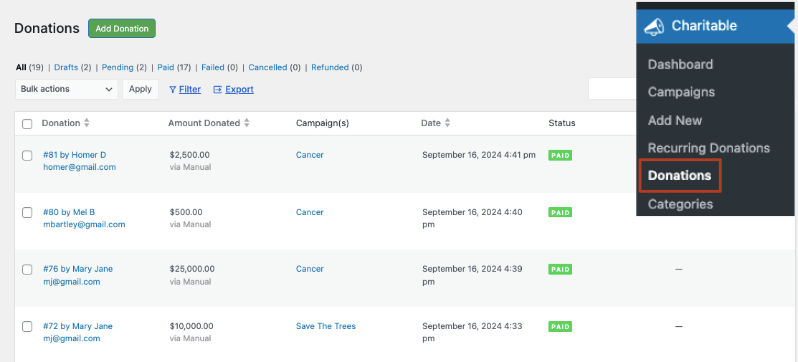
Charitable includes a robust donation management system. You can view donation history, export donor data, and even send targeted emails to specific donor segments.
If you haven’t already signed up for Charitable, what are you waiting for? Try Charitable’s advanced features with a 100% risk-free account.
If, for any reason, you feel it’s not the right fit for you, we offer a 14-day money back guarantee.


Leave a Reply