GoCardless is a payment processor laser-focused on providing affordable card-free payments through bank transfers and Direct Debit. The result is payments with radically lower fees than normal card payments.
Paid Extension
Charitable GoCardless is a premium plugin. Get it today with one of our plugin bundles.
How to install and activate the GoCardless plugin
Charitable GoCardless is a plugin and can be installed the same way as any other Charitable extension. Here are 5 quick steps to getting it up and running:
- Download the plugin from your account page.
- In your WordPress dashboard, go to Plugins > Add New.
- Next, click Upload Plugin.
- Choose the zip file you downloaded earlier and click Install Now.
- Activate your plugin!
Stuck? Check out read our guide to installing Charitable extensions for a detailed step-by-step tutorial with screenshots to help you along.
Activate the gateway
Now that the plugin is active, you still need to activate GoCardless as a payment gateway. For convenience, you can do this directly from the Plugins page by clicking on the “Activate GoCardless gateway” link:

You can also activate GoCardless on the Payment Gateways settings page:
- Go to Charitable > Settings > Payment Gateways
- In the GoCardless block, click on Enable Gateway.
Settings
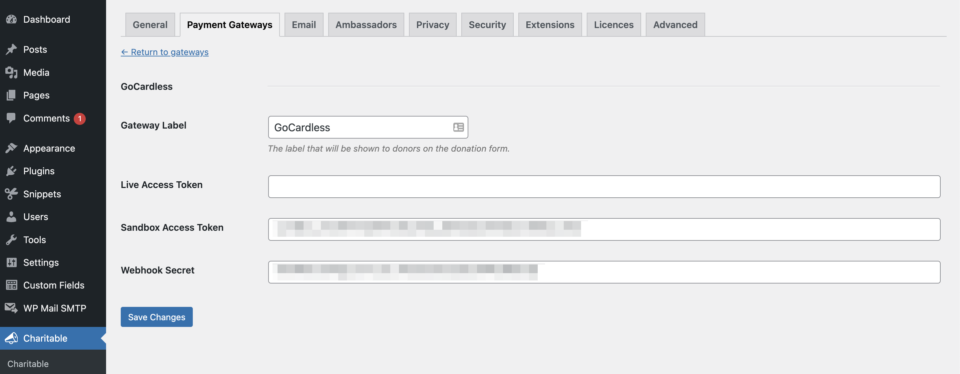
To take payments with GoCardless, you will need to configure Charitable with your GoCardless Access Token, as well as set up a webhook endpoint in your GoCardless account.
- Go to Charitable > Settings > Payment Gateways.
- Click on Gateway Settings.
If you don’t have a GoCardless account yet, now is the time to set one up: https://gocardless.com/
Setting up your API keys

To generate your GoCardless:
- Log into your GoCardless account area.
- Click on Developers in the sidebar menu.
- At the top right, click on Create and then click Access token.
- Copy and paste your Access Token from GoCardless into the “Live Access Token” field in your Charitable settings.
- Save your Charitable settings.

Add your webhook
The next step is to add a webhook endpoint in your GoCardless dashboard. Without a webhook endpoint, Charitable would not be notified about any payment status changes, or renewal donations if you are using Recurring Donations.

To create a webhook endpoint:
- On the same Developers page where you created the access token, click on Create.
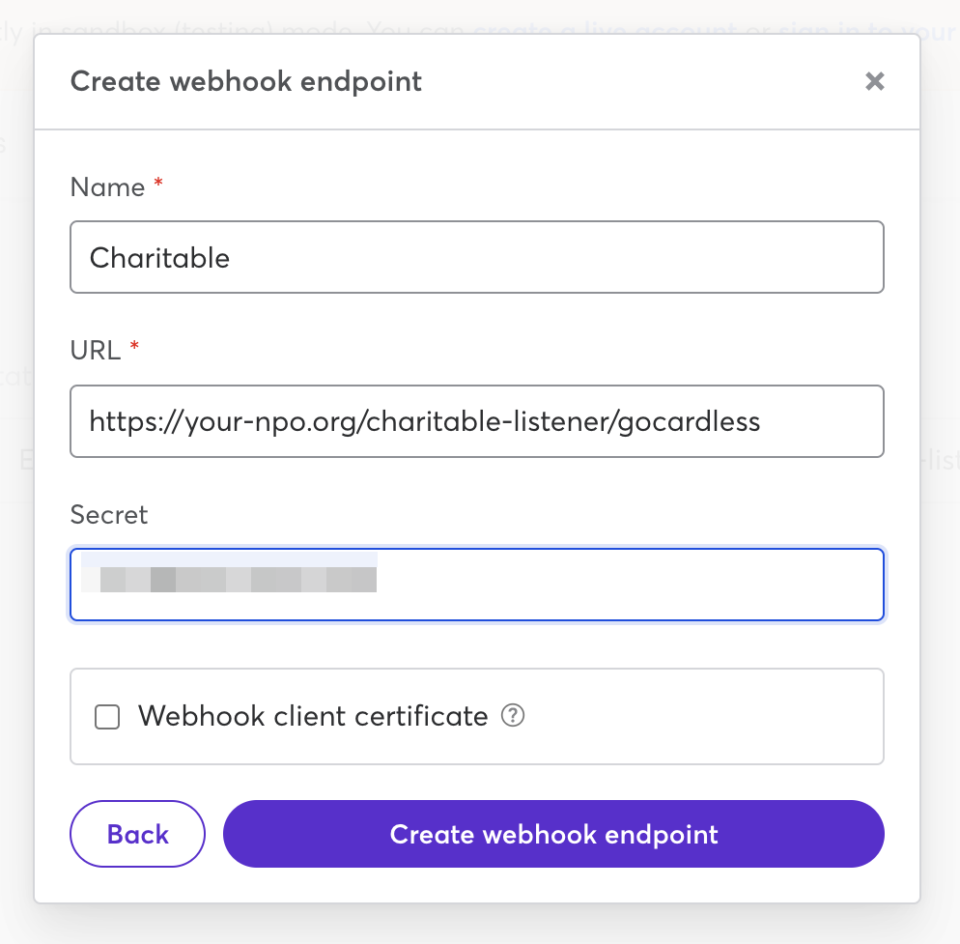
- Next, click Webhook endpoint. A modal window will pop up.
- Provide a “Name”. You may wish to name it Charitable to make it obvious what the webhook is used for.
- Set the “URL” setting to your website’s home URL followed by
charitable-listener/gocardless. For example, if your website is https://mynonprofit.org, your webhook URL will be:https://mynonprofit.org/charitable-listener/gocardless - It’s highly recommended to also provide a “Secret”. This should be hard to guess.
- You can keep the “Webhook client certificate” option unchecked.
- Finally, click Create webhook endpoint to save the webhook endpoint.

Using GoCardless in Test Mode
We always recommend testing payments when you first set up a new gateway. To test GoCardless, you will need to generate a new Access Token and Webhook Endpoint via the GoCardless sandbox. To do this:
- Go to https://manage-sandbox.gocardless.com/ and create/login to your account.
- The sandbox dashboard looks just like your live account dashboard. Follow the steps above to create your “Access Token”, and then save that in the “Sandbox Access Token” field in Charitable.
- Next, create a Webhook Endpoint, pointed to the same URL as the one you created earlier. Use the same “Secret” you used for your live account’s Webhook Endpoint.
With that done, you can test a donation by enabling Charitable’s Test Mode:
- In your WordPress dashboard, go to Charitable > Settings > Payment Gateways and check the “Turn on Test Mode” setting. Save your changes.
- Create a new donation via your website, using GoCardless as the payment gateway. For your payment, you can use the test bank details made available by GoCardless.
- After completing your “payment”, you will be returned to your website. Since GoCardless payments are not instantaneous, your donation will have a status of Pending in the WordPress dashboard under Charitable > Donations.
- In the meantime, click on the donation you just created and then find the “Gateway Transaction ID” field. Clicking this will take you directly to your GoCardless payment page where you can see the status of the payment.
- Check back in a few days to confirm that it has been marked as Paid — this will verify that your webhook endpoint is working as expected.
