Braintree is a payment service from PayPal that lets donors pay by credit or debit card, PayPal, Venmo (US only), Apple Pay, Google Pay, or a local payment method like iDEAL and Bancontact. This guide walks through installing the addon, connecting your Braintree account, and configuring every setting on the gateway’s settings page.
Braintree is available in the Charitable Pro plugin – All plans (Basic, Plus, Pro, and Elite)
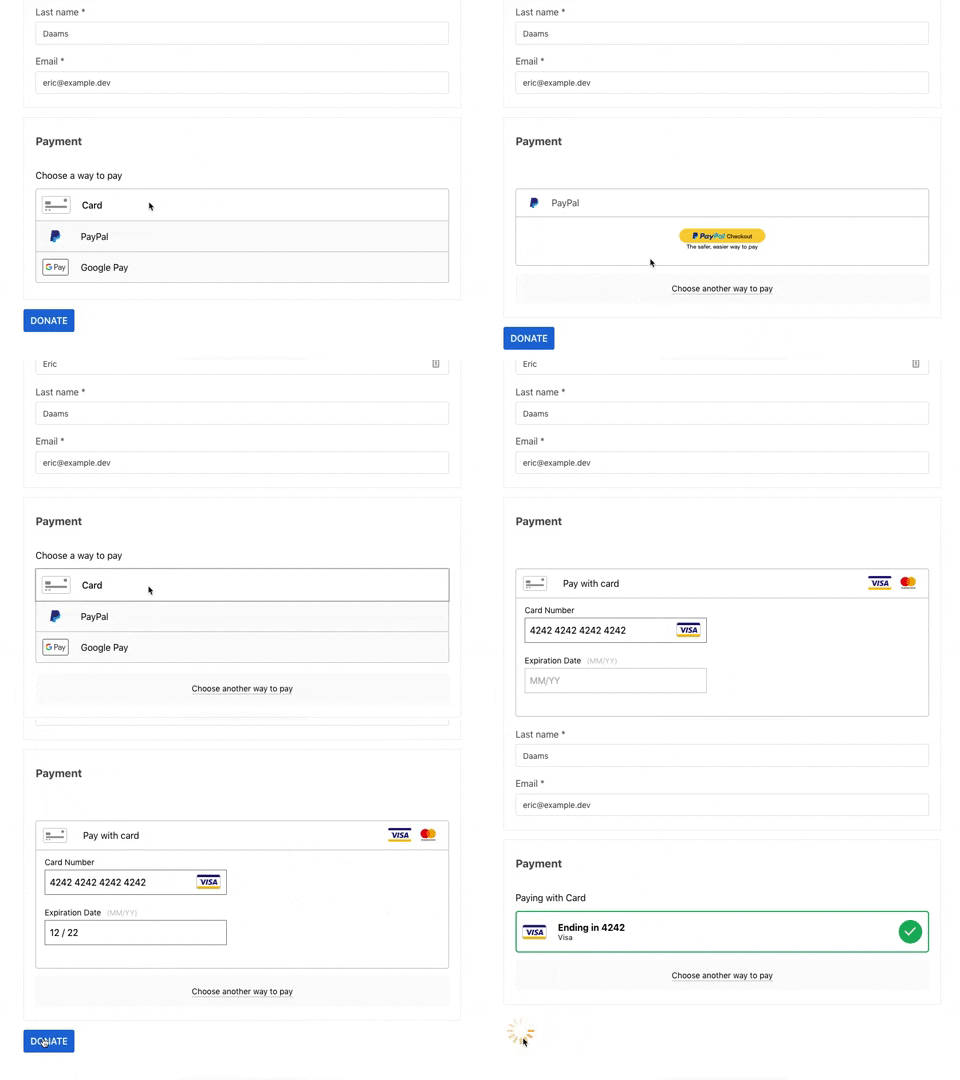
Here’s the Braintree user interface:
What’s In This Guide?
- Minimum Requirements
- Installing the Braintree Addon
- Enabling the Gateway
- Adding Your API Credentials
- Enabling Advanced Fraud Tools
- Enabling Additional Payment Methods
- Enabling Local Payment Methods
- Enabling 3D Secure
- Setting Up Webhooks
- Setting Up Recurring Billing Plans
- Supporting Multiple Currencies
- How Braintree Gives You Complete Data Security and Privacy
- FAQs on Braintree
Minimum Requirements
- PHP 7.4+
- Charitable 1.6.43
In addition, the following PHP extensions should be installed:
- curl
- dom
- hash
- openssl
- xmlwriter
Installing the Braintree Addon
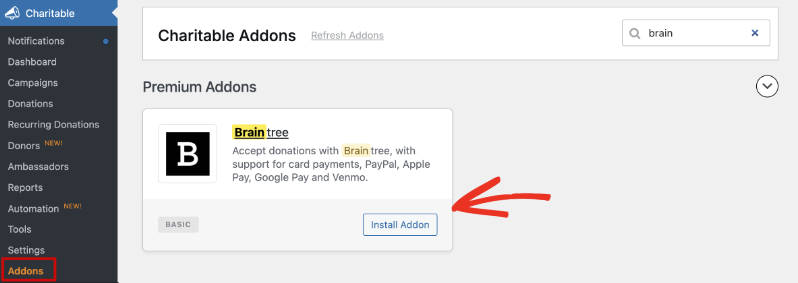
Installing Braintree is the same as installing any other Charitable addon. Go to Charitable » Addons, find Braintree in the list, and click “Install Addon.” Once it finishes installing, click “Activate.”
Note: If you’ve never installed a Charitable addon before, see our guide to installing Charitable extensions for more detail.
Enabling the Gateway
Go to Charitable » Settings » Payment Gateways. You’ll see Braintree listed among the available gateway options.
Click “Enable Gateway” next to Braintree.
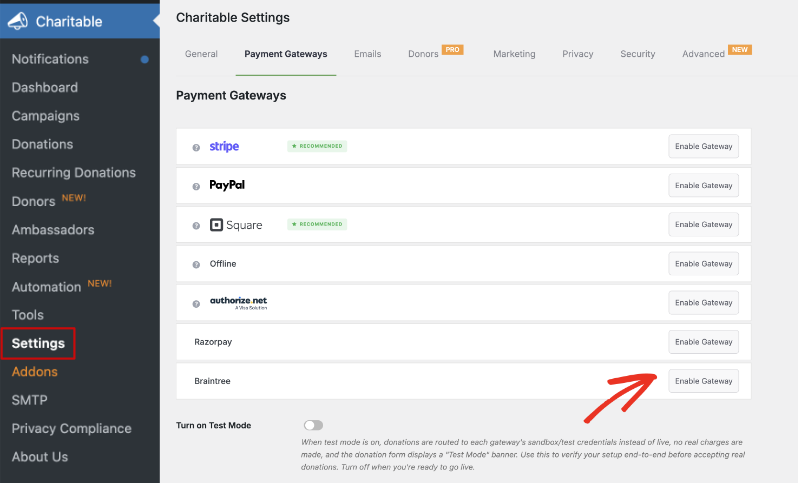
After the page reloads, a new “Gateway Settings” button appears next to Braintree. Click it to open the gateway’s settings page, where you’ll add your credentials and configure the rest of the options covered below.
Pro tip: Notice the “Turn on Test Mode” toggle at the bottom of the Payment Gateways tab. Switch it on and every enabled gateway, including Braintree, routes donations to its sandbox or test credentials instead of live ones. No real charges are made, and your donation form displays a “Test Mode” banner. Use it to test your setup end to end, then turn it off before you start accepting real donations.
Adding Your API Credentials
At the top of the Braintree settings page, you’ll see the Gateway Label field. This is the label your donors see when choosing a payment method on the donation form. It defaults to “Braintree,” but you can change it to anything you like.
Below the Gateway Label, you’ll find Live Mode Settings and Test Mode Settings:
- Live Mode Settings – Use the credentials from your live Braintree account. Donations processed here charge real cards and accounts.
- Test Mode Settings – Use the credentials from a Braintree sandbox account. Donations processed here are simulated, so no money changes hands.
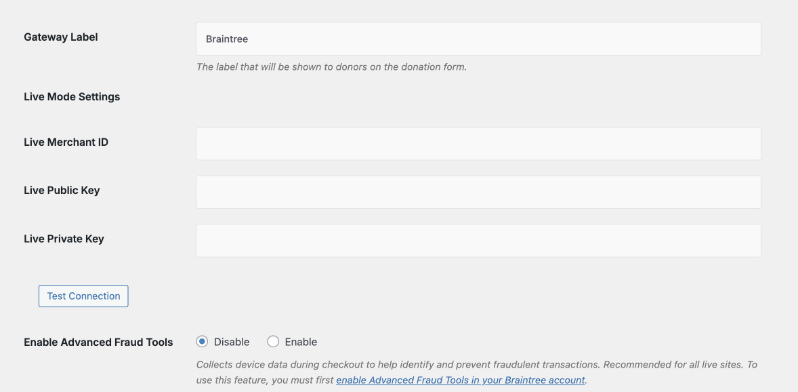
Each set of settings, Live and Test, needs the same three values: a Merchant ID, a Public Key, and a Private Key. Here’s how to find them in your Braintree Control Panel.
Finding Your Merchant ID, Public Key, and Private Key
- Log in to your Braintree Control Panel.
- Click the gear icon in the top right corner, then click “API.”
- Under the “API Keys” section, you’ll find your Public Key listed directly. If no keys appear yet, click “Generate New API Key.”
- Click “View” in the Private Key column. On the following screen, you’ll see your Private Key, Merchant ID, and Public Key listed together.
- Copy each value into the matching field in Charitable, then click “Test Connection” to confirm Charitable can reach your Braintree account before you save.
Note: Braintree has been rolling out a redesigned Control Panel, so a few menu labels may look slightly different from what’s described here. If you can’t find a setting where this guide says it should be, check Braintree’s own support articles or use the search bar in your Control Panel.
To test Braintree before going live, create a free sandbox account at sandbox.braintreegateway.com. You’ll find your sandbox Merchant ID, Public Key, and Private Key the same way as above. Copy and paste them into Test Mode Settings.
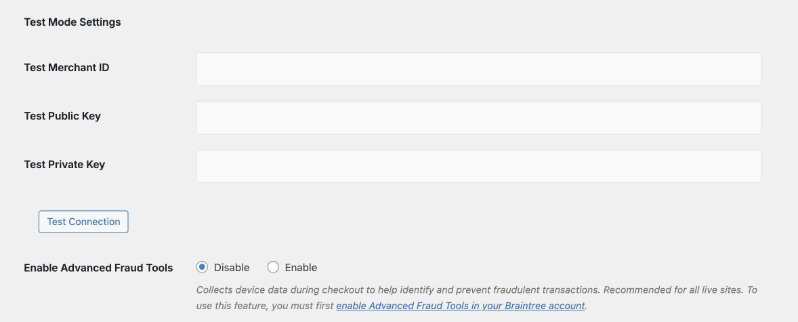
When you’ve added your credentials, click “Save Changes.”
Enabling Advanced Fraud Tools
Advanced Fraud Tools collects device data during checkout to help identify and prevent fraudulent transactions. We recommend turning it on for any live site.
Important Note: This feature has limited availability and regional restrictions on Braintree’s side, so it isn’t a simple dashboard toggle. Contact Braintree support to confirm your account is eligible and have it turned on before you enable it in Charitable.
Once Braintree confirms it’s active on your account, select “Enable” next to Enable Advanced Fraud Tools under Live Mode Settings (and Test Mode Settings, if you’d like to test it in your sandbox account too), then click “Save Changes.”
Enabling Additional Payment Methods
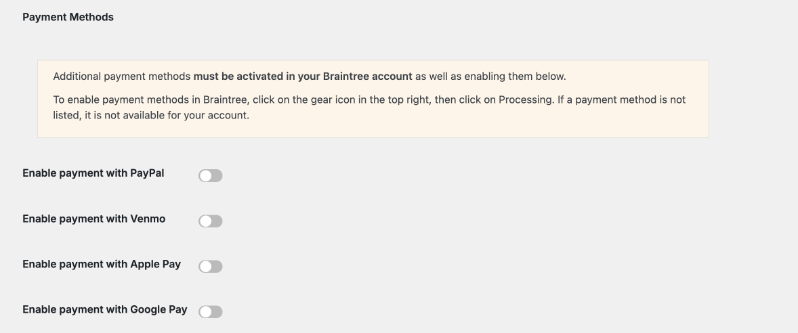
Besides card payments, Braintree lets you accept PayPal, Venmo, Apple Pay, and Google Pay. Each method needs to be turned on in your Braintree account as well as in Charitable. If a method doesn’t appear as an option in Braintree, it isn’t available for your account.
Step 1: Enable payment methods in Braintree
- In your Braintree Control Panel, click the gear icon in the top right corner, then click “Processing.”
- Turn on any payment methods you’d like to accept.
Note: Venmo is only available to US-based Braintree accounts. A sandbox account can turn it on instantly for testing, but a live account needs to submit an application, including your business details and expected transaction volume, and wait for Braintree’s approval. Apply early if you want Venmo ready by launch, since approval isn’t instant.
Important Note: Apple Pay needs more than a toggle. From the same Processing page, go to Apple Pay » Options and add your Apple Merchant Certificate. Apple Pay won’t work at checkout until that’s done.
Step 2: Enable payment methods in Charitable
Once a payment method is turned on in Braintree, check its box under Payment Methods in your Charitable Braintree settings.
Enabling Local Payment Methods
Local payment methods appear below the card form automatically once your site’s currency matches a method’s supported currency. Charitable currently supports six local payment methods through Braintree:
- iDEAL – EUR only. Netherlands.
- Bancontact – EUR only. Belgium.
- EPS – EUR only. Austria.
- BLIK – PLN only. Poland.
- Przelewy24 – PLN or EUR. Poland.
- MyBank – EUR only. Italy, Portugal.
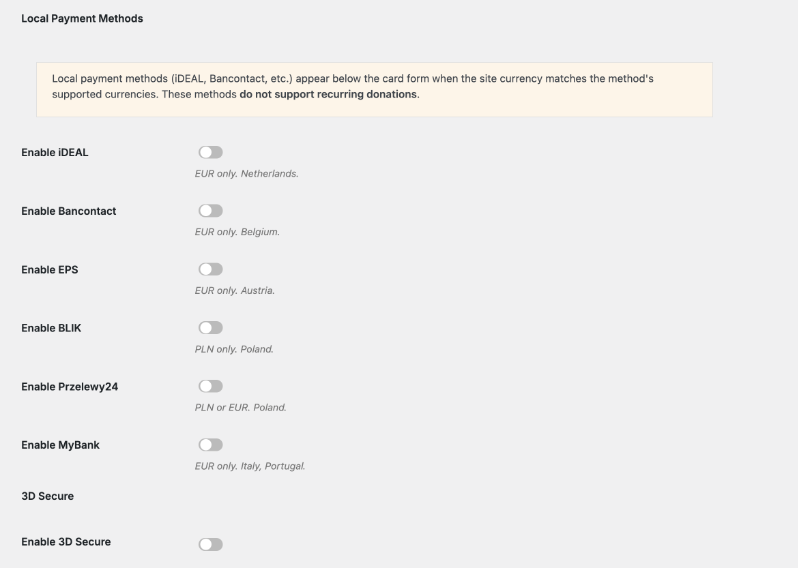
Important Note: Local payment methods don’t support recurring donations. They also settle asynchronously, moving from pending to paid after the donor confirms with their bank, so you’ll need a webhook set up (covered below) for Charitable to catch the final payment status.
For a closer look at how local payment methods work for donors, see our guide to using Braintree local payments.
Enabling 3D Secure
Charitable integrates with Braintree’s 3D Secure 2 functionality, which reduces fraud, improves security, and helps meet Strong Customer Authentication (SCA) requirements on card payments.
Important Note: 3D Secure is turned on automatically in a Braintree sandbox account, but a live account needs to contact Braintree support to have it enabled, since availability depends on your region and account setup. It isn’t a simple self-serve toggle on Braintree’s side.
Once Braintree confirms 3D Secure is active on your live account, check the “Enable 3D Secure” box in your Charitable Braintree settings and click “Save Changes.”
Setting Up Webhooks
Braintree uses a webhook to notify your website whenever a subscription-related event happens, like a renewal being charged, a recurring donation being cancelled, or a renewal failing. If you use local payment methods, Braintree also uses the webhook to tell Charitable when a pending payment finally settles.
Without a webhook, Charitable never finds out about these events, so it’s worth setting one up even if you’re not sure yet whether you’ll need it.
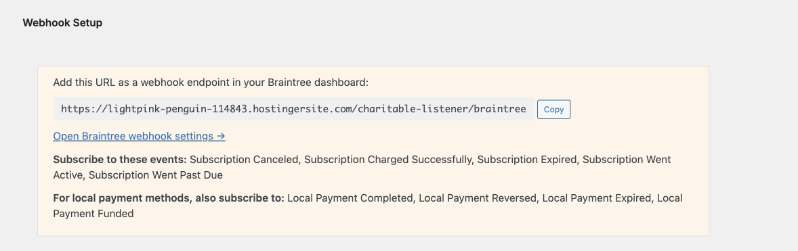
- Under Webhook Setup in your Charitable Braintree settings, click “Copy” to copy the webhook URL.
- Click “Open Braintree webhook settings” (or, in your Braintree Control Panel, click the gear icon in the top right, then click “API,” then click the “Webhooks” tab).
- Click “Create New Webhook.”
- Paste the URL you copied from Charitable into the Destination URL field.
- Under Notifications, subscribe to: Subscription Canceled, Subscription Charged Successfully, Subscription Expired, Subscription Went Active, and Subscription Went Past Due.
- If you’re using local payment methods, also subscribe to: Local Payment Completed, Local Payment Reversed, Local Payment Expired, and Local Payment Funded.
- Click “Check URL” to confirm the webhook can reach your website. Your server should respond with a
200status.
Note: Creating a webhook requires the “Manage Webhooks” permission on your Braintree user account. If you don’t see the option to create one, ask whoever manages your Braintree account to grant that permission or set up the webhook for you.
If you’re using the Braintree sandbox to test your setup, repeat these same steps in your sandbox account so test donations trigger the webhook too.
Setting Up Recurring Billing Plans
If you’re using Braintree alongside Charitable’s Recurring Donations addon, you’ll need a billing plan in Braintree before donors can start a recurring donation. When someone starts a recurring donation, Braintree creates a subscription for them, using this plan as a template.
Note: A plan’s price in Braintree is just a default. Charitable can override it for individual subscriptions, so you can usually get away with one plan per billing period (daily, monthly, and so on) rather than a separate plan for every donation amount.
Creating a plan in Braintree
- In your Braintree Control Panel’s top navigation, click “Subscriptions,” then click “Plans.”
- Click “+ Create A Plan.”
- Enter the plan’s name, default price, currency, and billing frequency. A plan ID and description are optional. Leave every other setting as it is.
- Click “Create.”
Selecting your default plans in Charitable
Back in your Charitable Braintree settings, scroll to Recurring Billing. Under Default Live Plans, select the Braintree plan you’d like to use for each recurring donation period Charitable offers: Daily, Monthly, Quarterly, Semiannually, and Annually.
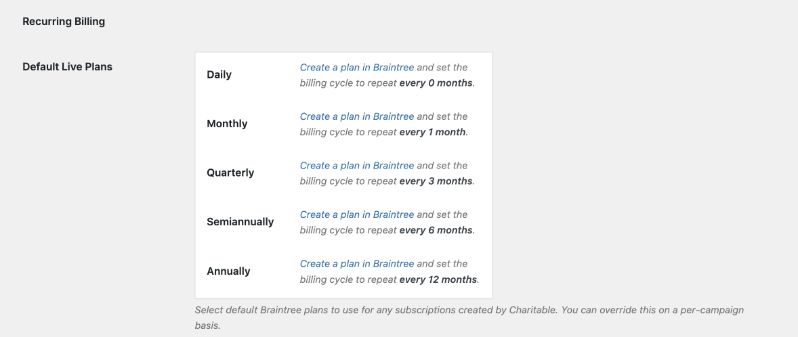
Repeat this under Default Test Plans, using plans created in your Braintree sandbox account, so you can test recurring donations before going live.
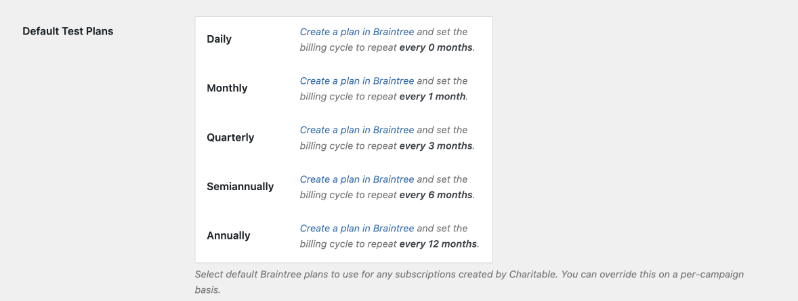
You only need to set a default for the periods you actually offer donors. You can also override the default plan for a specific campaign from that campaign’s Recurring Donations settings, which is useful if you’d rather track a campaign’s recurring donations separately in your Braintree dashboard.
Supporting Multiple Currencies
Important Note: A Braintree merchant account doesn’t accept multiple currencies by default. Before you can accept donations in a currency other than your account’s default, contact Braintree to have currency-specific merchant account IDs set up for you.
Once Braintree confirms a currency is supported on your account, go to Multi-Currency in your Charitable Braintree settings and check the box next to that currency under Supported Currencies.
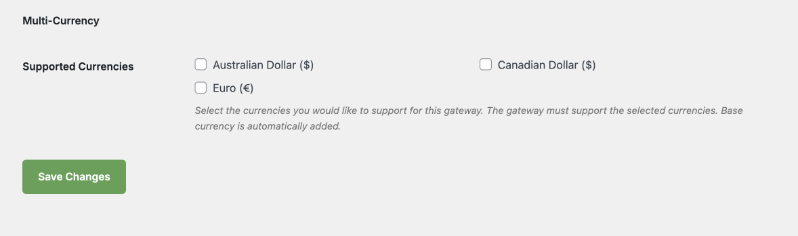
Your site’s base currency is added automatically and can’t be unchecked. Checking a currency Braintree hasn’t set up for your account will cause donations in that currency to fail, so confirm with Braintree first.
How Braintree Gives You Complete Data Security and Privacy
Cardholder data is managed natively in Braintree’s secure system, using multiple encryption keys with split knowledge and dual control.
This offers non-profits the security of knowing their donors’ financial information is private and secure.
Passwords are never stored directly in the database, and all API and Control Panel communication between merchants and Braintree are conducted using TLS (Transport Layer Security), completely safeguarding your donors’ data.
Braintree is available in the Charitable Pro plugin starting on the Basic plan.
Not yet on Charitable Pro? You can get up to 50% off when you sign up for or upgrade to Charitable Pro. We want to ensure that you can try the advanced fundraising features like Recurring Donations, Donation Recovery, and more at a significantly reduced cost.
Join over a million satisfied Charitable Pro users today. Every purchase comes with a 14-day money-back guarantee, ensuring you’re supported every step of the way.
If you have any questions or need assistance, our support team is ready to help you make the most of these new features.
FAQs on Braintree
Do I need my own Braintree account to use this addon?
Yes. Charitable’s Braintree addon connects to an account you create directly with Braintree. If you don’t have one yet, sign up at braintreepayments.com before you start.
Is Venmo available to donors outside the United States?
No. Venmo only works with US-based Braintree accounts and US donors. Donors elsewhere will need to use a card, PayPal, or another supported method.
I turned on 3D Secure or Advanced Fraud Tools in Charitable, but it doesn’t seem to be working. Why?
Both features need to be enabled or approved on Braintree’s side first. If you haven’t already contacted Braintree support to confirm your account is eligible and turn the feature on, the toggle in Charitable won’t have anything to connect to.
Can a donor set up a recurring donation with a local payment method like iDEAL?
No. Local payment methods only support one-time donations. A donor who wants to give on a recurring basis will need to pay by card, PayPal, or another supported recurring-friendly method.
Do I need a webhook if I’m not using recurring donations or local payment methods?
Not strictly, but we still recommend adding one. A webhook is required if you use Recurring Donations or offer any local payment method, since Charitable depends on it to receive status updates for both.
Can I accept a currency Braintree hasn’t set up for my account yet?
No. Contact Braintree first to have a merchant account ID created for that currency. Checking the currency in Charitable before Braintree confirms it’s ready will cause those donations to fail.
More Documentation
Helpful Links
🤝 Get help when you need it
Connect with Customer Support →
📑 Find the guide you need
Browse the Documentation Hub →
⬇️ Download proven strategies, campaign ideas, and expert tools
Get the Fundraising Kit →
💸 Get Free Fundraising Resources
Head to the Charitable Fundraising Hub →
🤔 Got questions about Charitable?
Charitable FAQs →
Need help understanding non-profit terms and jargon?
See our Non-Profit Glossary →