Charitable Automation Connect allows you to connect Charitable with thousands of other apps by using 3rd party automation platforms like Zapier, Integromat or Zoho Flow.
How to install and activate the Automation Connect plugin
The Automation Connect is a plugin and can be installed the same way as any other Charitable extension. Here’s a quick how-to:
- Download your extension from your account page or your purchase receipt email.
- Go to Plugins > Add New in your WordPress dashboard.
- Click the Upload Plugin button at the top of the page.
- Select the zip file you downloaded in step 1 and click Install Now.
- Activate your plugin!
Stuck? Check out read our guide to installing Charitable extensions for a detailed step-by-step tutorial with screenshots to help you along.
Understanding webhook subscriptions
Automation Connect is built around webhook subscriptions. So what is a webhook subscription?
In short, a webhook subscription is an instruction to Charitable that you would like information (the data) sent to a specific URL (the delivery URL) whenever a certain event happens on your website (the trigger event).
For example, let’s suppose that you use a CRM like Salesforce. Whenever you receive a new donation, you would like information about that donation to be sent to Salesforce.
In this scenario, the data is your donation and will include information like the donation amount, the donor’s name and email address, the status of the donation, and more. (Skip ahead if you’d like to see all the information that is sent for donations, recurring donations and campaigns by Charitable.)
The trigger event is a new donation, though you will probably also want to create automated workflows to handle when a donation is updated, moved to the trash, or restored from the trash.
Finally, the delivery URL will be a unique link to an automation app like Zapier, Integromat, Zoho Flow, Automate.io or any other app that allows you to configure a webhook URL. You can then use your automation app to take the data received from Charitable and send that to Salesforce.
How to create, edit or delete a webhook subscription
Tip for Zapier users
If you’re using Zapier, you don’t need to worry about managing webhook subscriptions in your WordPress dashboard. Our Zapier app allows you to handle all of this from the Zapier side of things.
You can create, edit and delete webhook subscriptions by going to Charitable > Settings > Advanced.
If you’re on the Plugins page, you can go directly to this page by clicking on the “Webhook Subscriptions” quick link for the Charitable Automation Connect plugin.
Create a webhook subscription
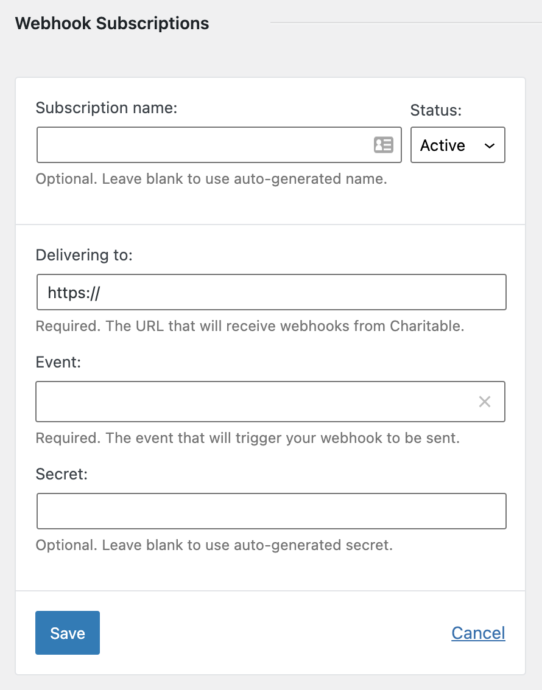
- Click Add Webhook Subscription to create a new webhook subscription.
- Optionally, you may add a descriptive name for your subscription. For example, you could call it “Integromat Donations” to clarify that it’s for sending Donation events to Integromat:
- Paste in the delivery URL. This is a unique URL created by your automation app.
- Choose the event that will trigger your webhook.
- Optionally, set a Secret to be used for the webhook. Leave this blank to let Charitable auto-generate one.
- Click on Save to create the subscription.
Edit or delete a webhook subscription
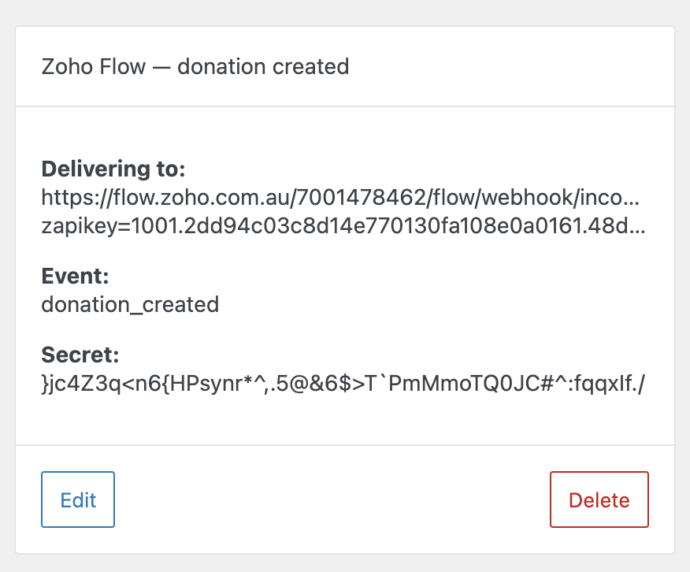
Once you have set up a webhook subscription, you can edit it by clicking the Edit button; this will open up the same webhook subscription form used when you created the subscription.
To delete the subscription, click Delete and then confirm the deletion by clicking Delete webhook subscription.
Don’t forget!
When you delete a webhook subscription, you should also delete the Zap/Scenario/Flow/Bot using this webhook subscription in your automation app to avoid being overcharged by the automation platform.
How to connect Zapier
Zapier is an app that allows you to automatically move information between different apps. It connects to over 3,000 apps.
You’ll need a Zapier account to follow these next steps. Click here to sign up.
Charitable’s Zapier integration is currently in invite-only mode. Click the link below to start using it:
https://zapier.com/developer/public-invite/145749/3951e2d476c62199212c9731642ed145/
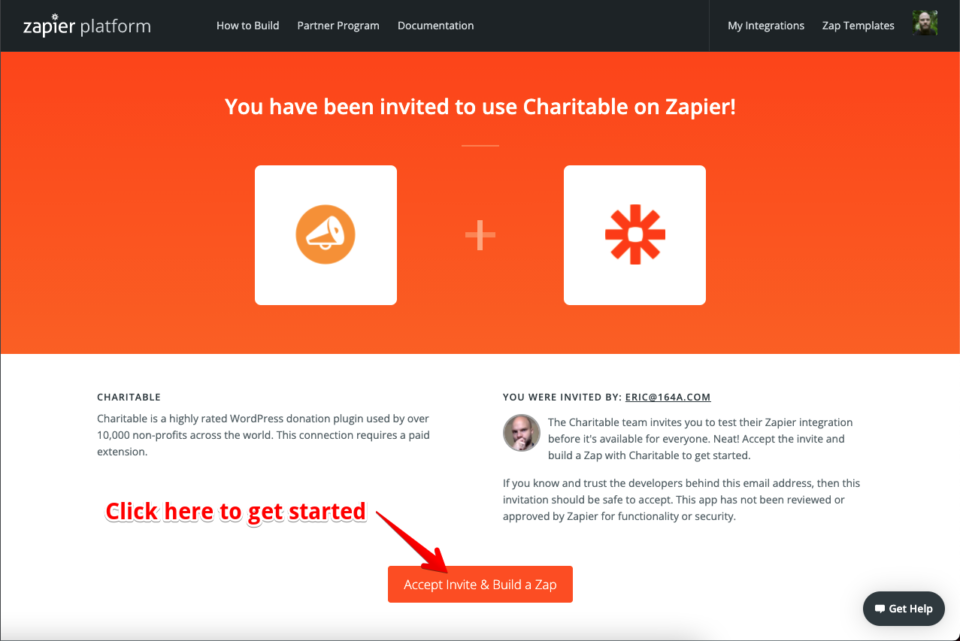
Next, click on Accept Invite & Build a Zap to start using the integration, as shown below:
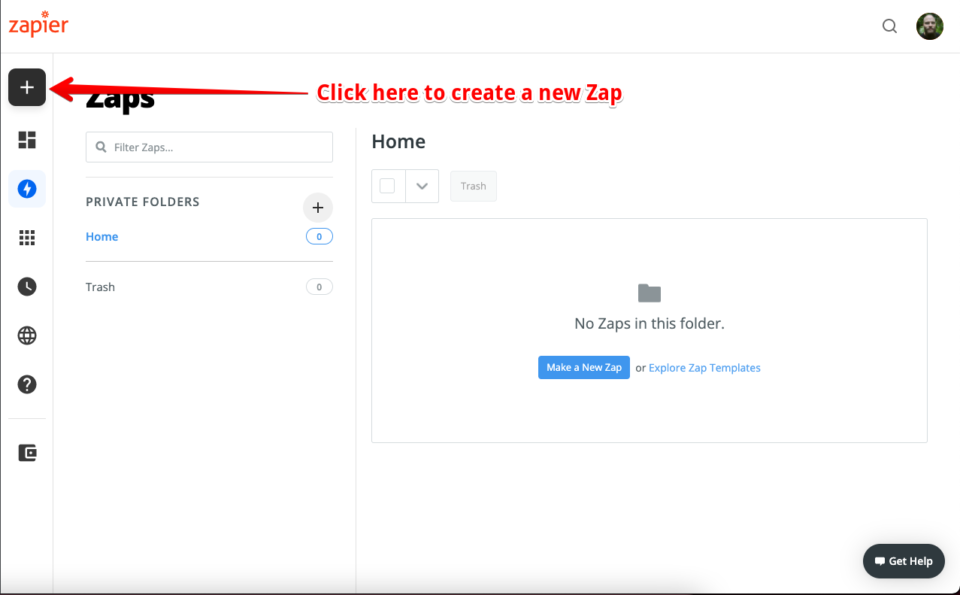
In the Zapier dashboard, click on the Create Zap button in the left menu to create a new Zap. If you’re on a smaller screen, the Create Zap button is replaced with a large + button:
Setting up a Zap for your Charitable event
A Zap requires two things:
- A Trigger, which is the event that start the automated workflow
- An Action, which is the action that will take place as a result of the event
In our case, the Trigger will be a Charitable event, like a new donation or an update to a campaign. Charitable cannot be used for the Action step.
1. Choose a Charitable event as the Trigger for your Zap
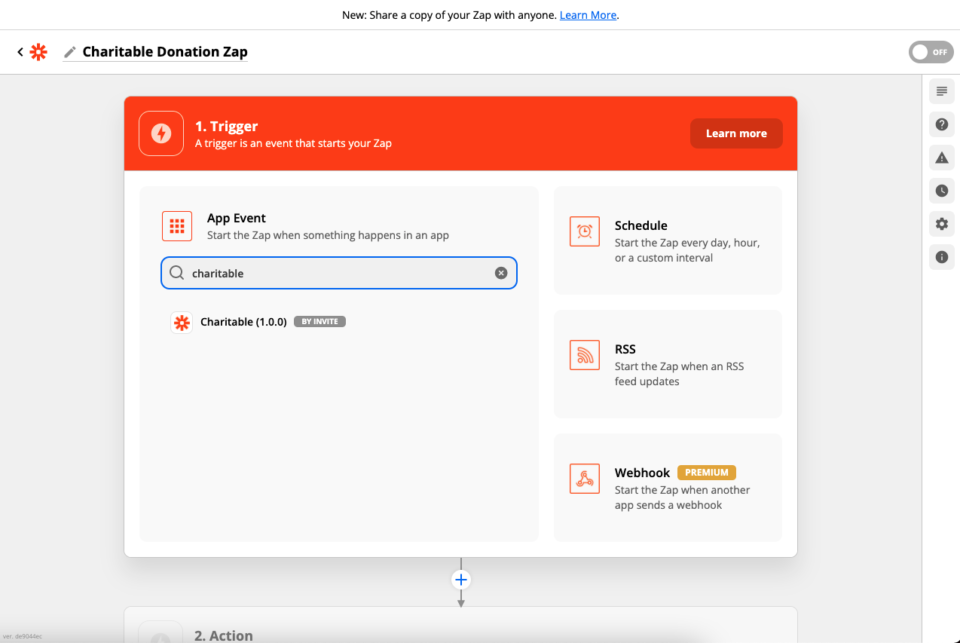
Give your Zap a name and then search for Charitable in the app search field:
Zapier will then ask you to choose the Trigger Event:
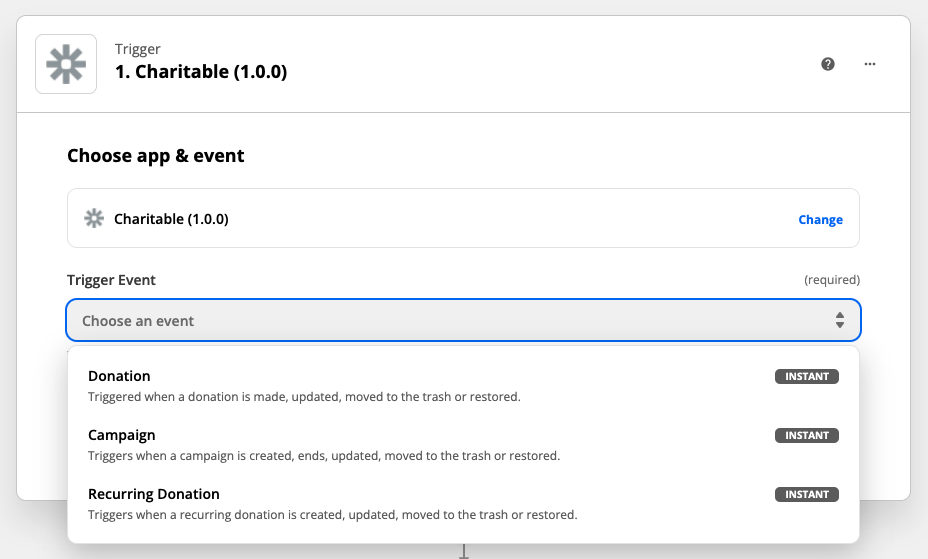
Once you have chosen an event, click on Continue to go to the next step.
2. Set up the Charitable connection
If this is the first time you’ve created a Zap with Charitable, you will need to set up the Charitable connection.
Click on Sign in to Charitable to get started:
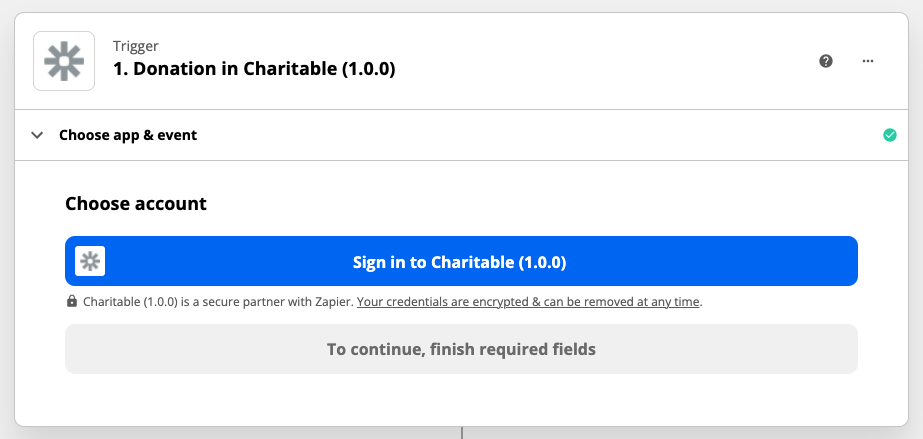
A new window will pop up with a form for you to fill out:
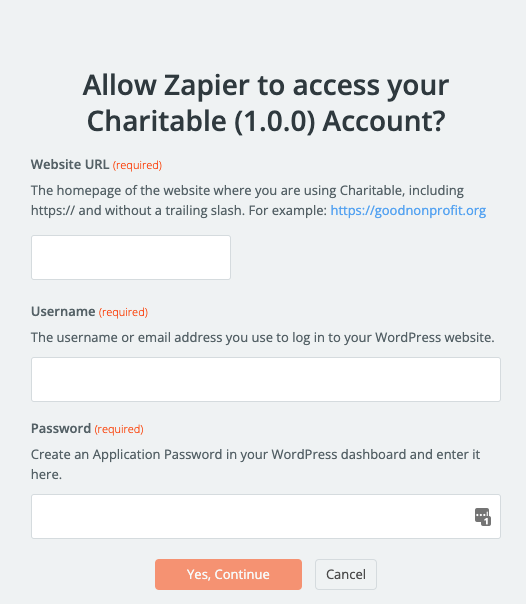
There are three things to fill out:
- Your website URL. This is the URL of the website where Charitable is installed.
- Your username for your website.
- An Application Password for your account on the website.
While you can also use your regular website password, we strongly recommend creating an Application Password since this keeps your normal password more secure. If you’re not sure how to create an Application Password, skip ahead to the step-by-step instructions to creating an Application Password.
Once you have connected your website account, click Continue to proceed to the next step.
3. Set up a specific Trigger Event
Earlier, you chose the type of Trigger to use for your integration, based on the type of resource: a Campaign, Donation or Recurring Donation. Now you need to choose a specific event related to that resource.
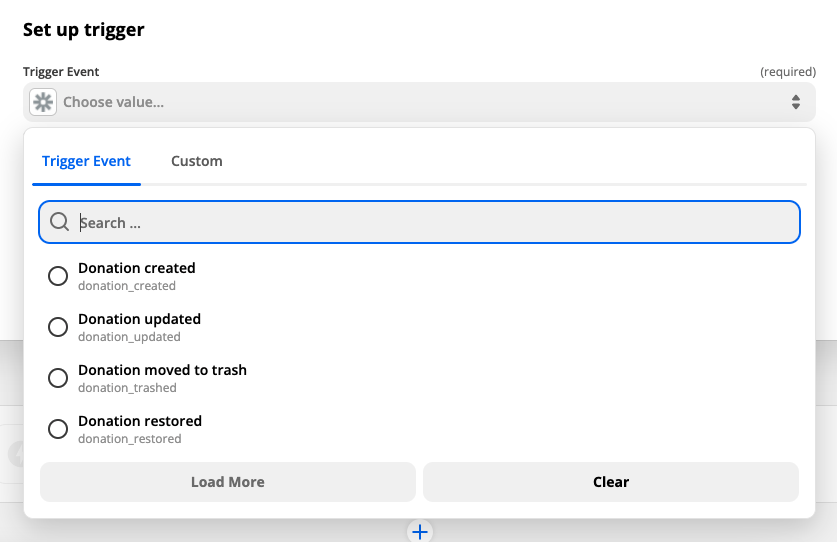
After choosing one, click on Continue.
4. Test the trigger
Finally, you can test the Trigger by clicking Test Trigger. This will ensure that everything is set up correctly and will also give you sample data to show you what will be included in the information sent to Zapier by Charitable.
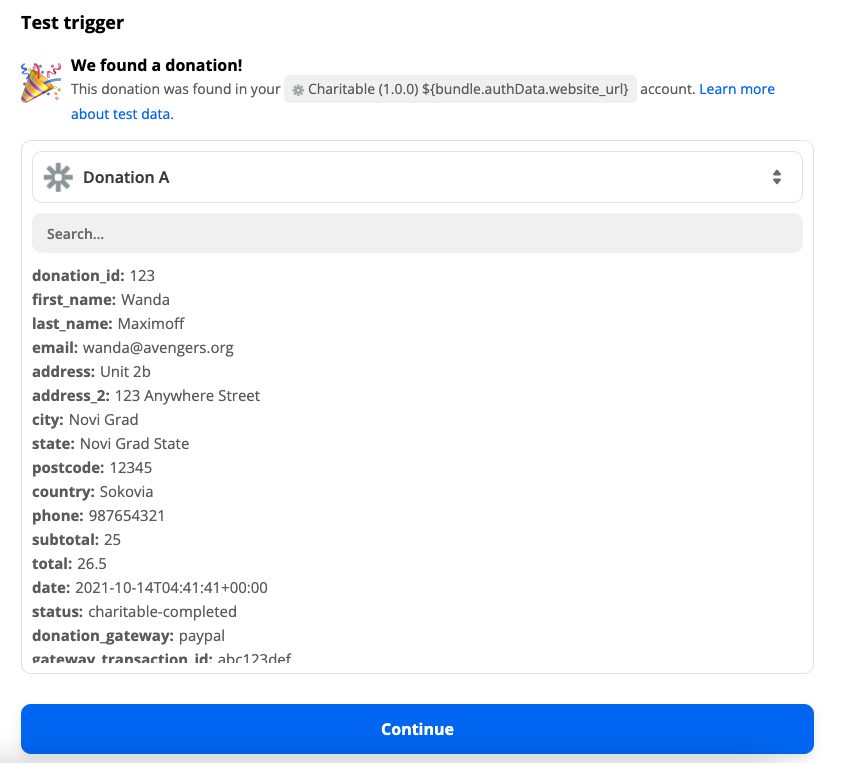
Assuming everything was set up correctly, click Continue to proceed to the Action setup step for your Zap.
5. Set up the Action for your Zap
The final step is to create an Action for your Zap.
There are thousands of different ways you can use Zapier and Charitable together to automate workflows for your non-profit. Here are a few examples:
- Add donations to a CRM like Salesforce.
- Add donations to a Google Sheet.
- Add campaign creators or donors to a special list in your email marketing provider (if it’s not one that we already support with our Newsletter Connect plugin).
- Set up an event in Google Calendar to record when a campaign is ending.
- Send an email after a donation is created or when a campaign is added.
When you set up the Action, you will be able to select the data from Charitable that you would like to use.
For example, in the screenshot below, new donations are added to a Google Sheet. The “Donation ID” and “Donor first name” fields correspond to columns in the Google Sheet I created, and I can choose from the Charitable data what needs to go into each column:
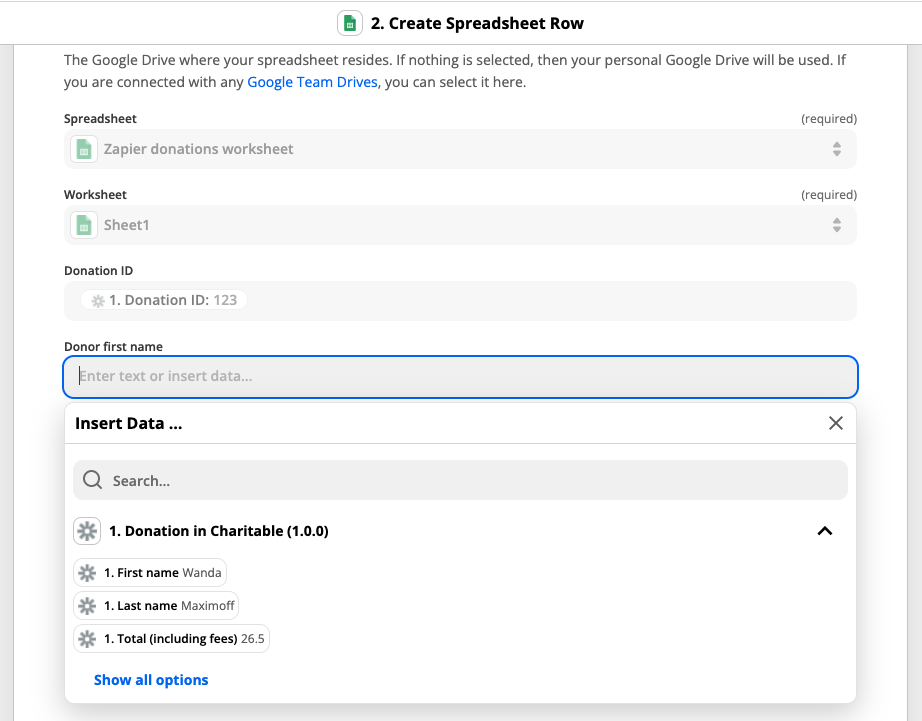
If you’re new to Zapier, you can follow along with this detailed guide to setting up Zap Actions.
6. Turn on your Zap
After you have finished setting up your Action, click on Test and Continue to try it out and make sure that everything is working the way you want it to.
If it is, the last step is to turn on the Zap by clicking Turn on Zap.
Next steps with Zapier
This guide has covered the basics of creating a Zap by setting up a Trigger and an Action. There is much more that you can do with Zapier. Here are a few examples of ways you can customize your Zaps, with links to Zapier documentation:
- Add conditions to your Zap
- Add branching logic to your Zap
- Add delays to Zaps
- Format incoming data in different ways
How to integrate with other automation apps
Automation Connect is designed to work alongside any automation app that allows you to configure a webhook subscription. Here are a few examples of apps that you can use instead of Zapier:
- Integromat
- Zoho Flow
- Automate.io
Integromat
You can integrate Charitable with Integromat by creating a Scenario and using the “Webhooks” module with the “Custom webhook” trigger option:
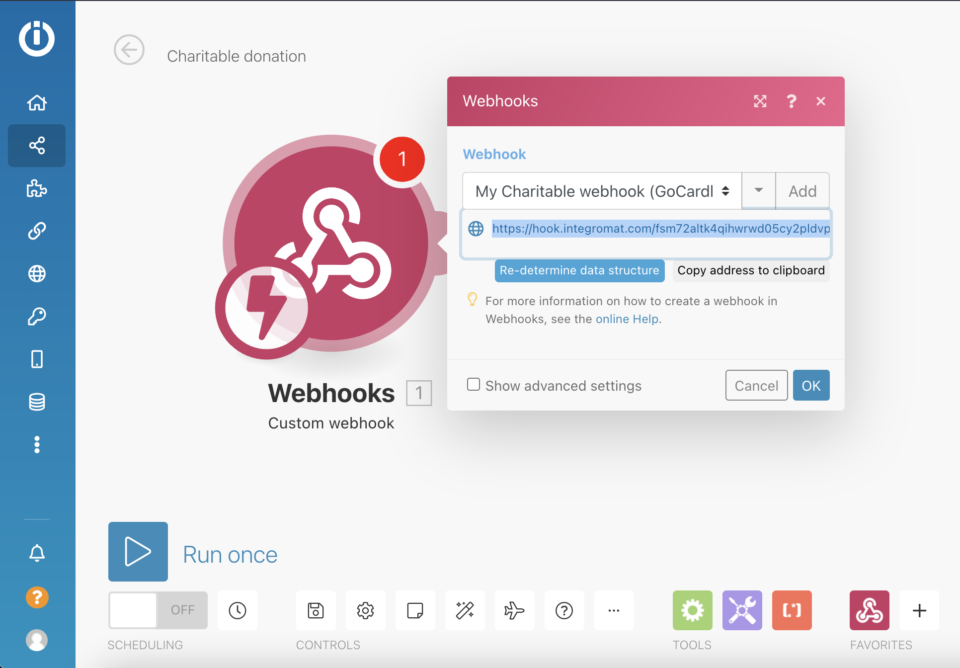
After setting this up, copy the address of the webhook and use it as the “Delivery URL” when creating a Webhook Subscription in your Charitable settings.
Zoho Flow
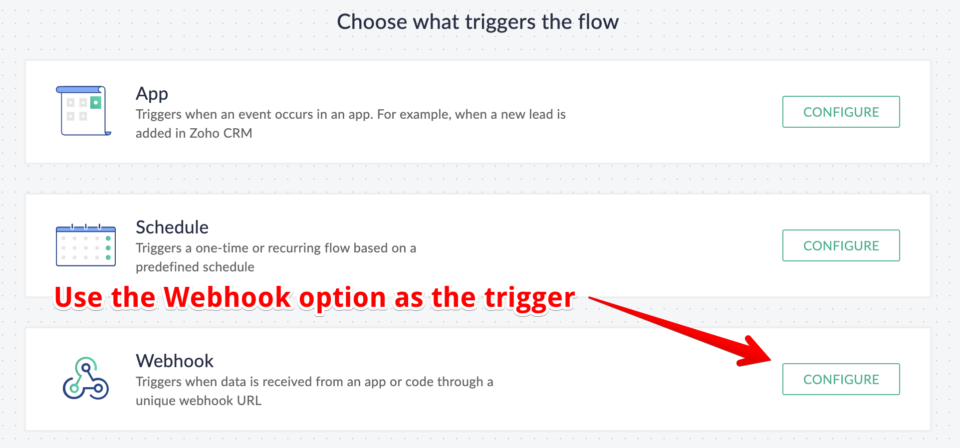
In Zoho Flow, create a new Flow. After setting a title and a description, choose “Webhook” as the trigger option:
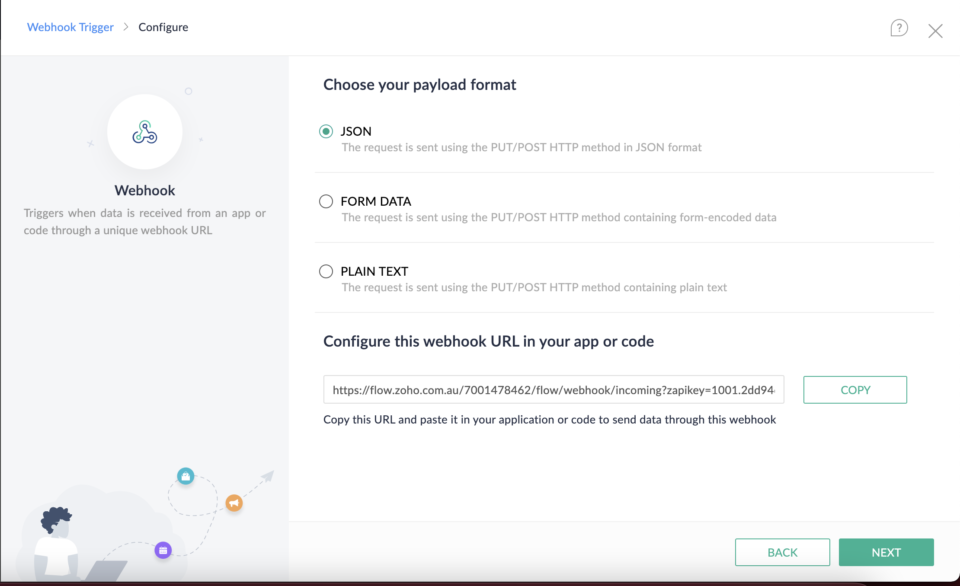
On the following page, leave the payload format set to JSON. Copy the webhook URL at the bottom and use it as the “Delivery URL” when setting up a new Webhook Subscription in Charitable:
Automate.io
In Automate.io, create a new Bot and use Webhooks as the Trigger, selecting the “Incoming Hook” option:
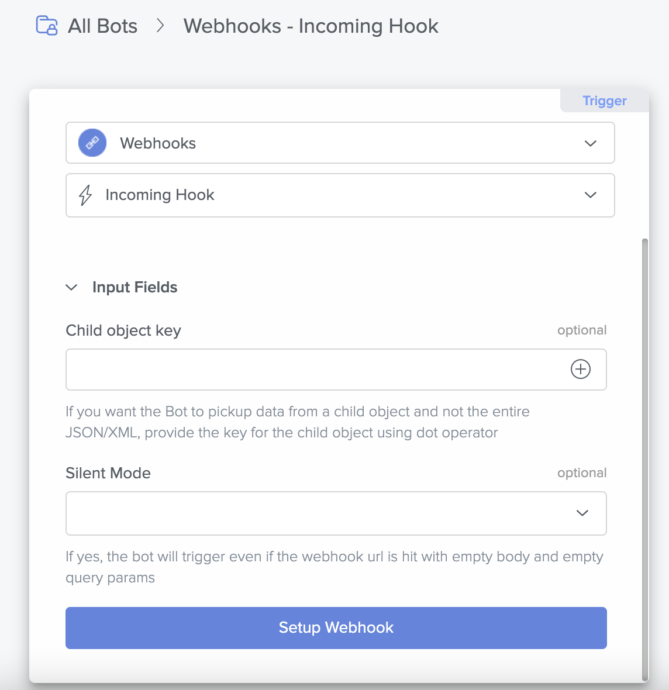
After clicking on Setup Webhook, a popup will appear with the URL you should use for your webhook. Copy this URL and use it as the “Delivery URL” when setting up a new Webhook Subscription in Charitable.

How do I create an Application Password for my integration?
You can create an Application Password in your WordPress dashboard.
- Go to your Profile page by clicking on Users > Profile in the left-hand menu. You can also get there by clicking on your profile picture in the top-right corner of the page and then clicking Edit Profile.
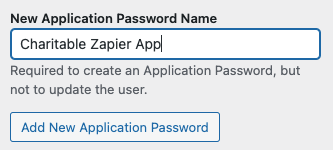
- Scroll down to the “Application Passwords” section. Give your Application Password a unique name to indicate how it’s used and then click on Add New Application Password.
- Copy and paste the Application Password and save it somewhere safe. You will not be able to access the password again:

What information does Charitable send to webhooks?
Charitable sends information about three types of resources:
- Donations
- Recurring Donations
- Campaigns
The information included will depend on which other Charitable extensions you have installed.
Donations
| Field key | Description | Availability |
|---|---|---|
| donation_id | Donation ID | Core |
| first_name | Donor first name | Core |
| last_name | Donor last name | Core |
| Donor email address | Core | |
| address | Donor address | Core |
| address_2 | Donor address line 2 | Core |
| city | Donor city | Core |
| state | Donor state/province | Core |
| postcode | Donor postcode/zipcode | Core |
| country | Donor country | Core |
| phone | Donor phone number | Core |
| subtotal | Donation amount, excluding any fees | Core |
| total | Total donation amount, including any fees | Core |
| date | Date of the donation | Core |
| status | Donation status | Core |
| donation_gateway | Payment gateway used | Core |
| gateway_transaction_id | Payment gateway id or reference for the donation | Core |
| test_mode | Whether the donation was made in Test Mode | Core |
| contact_consent | The donor’s Contact Consent status | Core |
| cover_fees | Whether the donor chose to cover fees | Fee Relief |
| fee_amount | The fee covered by the donor. | Fee Relief |
| consent_to_track | Whether the donor gave consent to being tracked (only applies if Campaign Monitor is used) | Newsletter Connect |
| newsletter_opt_in | Whether the donor opted in to receiving the newsletter | Newsletter Connect |
| gocardless_customer_id | The donor’s customer ID in GoCardless | GoCardless |
| gocardless_mandate_id | The GoCardless mandate ID used for the donation | GoCardless |
| giftaid_claimed | Whether the donor claimed Gift Aid | Gift Aid |
| title | Donor title | Gift Aid |
| address_3 | 3rd line of donor address | Gift Aid |
| anonymous_donation | Whether the donor chose to remain anonymous | Anonymous Donations |
| donor_comment | The donor’s comment | Donor Comments |
Recurring Donations
The Recurring Donation trigger is only available if you are using the Recurring Donations plugin.
| Field key | Description | Availability |
|---|---|---|
| recurring_donation_id | Recurring donation ID | Recurring Donations |
| first_donation_id | ID of the initial donation | Recurring Donations |
| recurring_subtotal | The amount donated on a regular basis (excluding fees) | Recurring Donations |
| recurring_total | The amount donated on a regular basis (including fees) | Recurring Donations |
| recurring_period | Recurring donation period (month, week, annual, etc.) | Recurring Donations |
| recurring_interval | Number of periods between recurring donations | Recurring Donations |
| recurring_length | Total number of times to renew recurring donation | Recurring Donations |
| recurring_expiration_date | Date on which the recurring donation will expire | Recurring Donations |
| recurring_renewal_date | Date on which the recurring donation will next renew | Recurring Donations |
| gateway_subscription_id | Payment gateway subscription id / reference | Recurring Donations |
| donation_id | Donation ID | Core |
| first_name | Donor first name | Core |
| last_name | Donor last name | Core |
| Donor email address | Core | |
| address | Donor address | Core |
| address_2 | Donor address line 2 | Core |
| city | Donor city | Core |
| state | Donor state/province | Core |
| postcode | Donor postcode/zipcode | Core |
| country | Donor country | Core |
| phone | Donor phone number | Core |
| subtotal | Donation amount, excluding any fees | Core |
| total | Total donation amount, including any fees | Core |
| date | Date of the donation | Core |
| status | Donation status | Core |
| donation_gateway | Payment gateway used | Core |
| gateway_transaction_id | Payment gateway id or reference for the donation | Core |
| test_mode | Whether the donation was made in Test Mode | Core |
| contact_consent | The donor’s Contact Consent status | Core |
| cover_fees | Whether the donor chose to cover fees | Fee Relief |
| fee_amount | The fee covered by the donor. | Fee Relief |
| anonymous_donation | Whether the donor chose to remain anonymous | Anonymous Donations |
| donor_comment | The donor’s comment | Donor Comments |
Campaigns
| Field key | Description | Availability |
|---|---|---|
| campaign_id | Campaign ID | Core |
| description | Short description | Core |
| goal | Fundraising goal | Core |
| end_date | Campaign end date | Core |
| title | Campaign title | Core |
| date | Campaign creation date | Core |
| campaign_creator_id | Campaign creator user ID | Core |
| campaign_creator_name | Campaign creator full name | Core |
| campaign_creator_email | Campaign creator email address | Core |
| donated_amount | Amount donated to campaign | Core |
| donor_count | Number of unique donors to campaign | Core |
| status | Campaign status | Core |
| permalink | Campaign URL | Core |
| recipient | Type of campaign. One of: – ambassador (campaign for your organization) – fundraiser (fundraiser for another campaign) – personal (personal cause campaign) | Ambassadors |
| post_parent | Campaign parent ID, or 0 if this is a not a fundraiser | Ambassadors |
| fundraiser_type | Type of fundraiser, or false if this is not a fundraiser. One of: – Team Member – Team – Individual | Ambassadors |
| creator_action_required | An action required from the campaign creator before their campaign can be activated. | Ambassadors |
| submitted_campaign_creator_email | The email address used by the person who submitted the campaign. This is the same as the campaign_creator_email field unless this is a Team Member campaign added by the team captain. | Ambassadors |
| supports_child_campaigns | Whether the campaign supports fundraisers. | Ambassadors |
| team_id | The ID of the team this fundraiser belongs to, or 0 if it’s not part of a team. | Ambassadors |
| team_name | The name of the team this fundraiser belongs to. | Ambassadors |
| team_captain_id | The user ID of the captain of the team this fundraiser belongs to, or null if it’s not part of a team. | Ambassadors |
