“Legacy” campaigns are the way campaigns were built by default before the introduction of the visual builder that debuted in Charitable 1.8.0. This method is no longer the default and is depreciated.
That being said: (1) Charitable will ALWAYS support campaigns created with legacy campaigns (2) Adding a legacy campaign is still possible via the campaign screen (3) Some third-party extensions rely on the legacy campaign builder (4) There are limited cases where a legacy campaign might still need to be created.
Creating a New Legacy Campaign
- Check your Charitable settings to ensure that the “disable legacy” option is unchecked in Charitable > Settings > Advanced.
- In your WordPress dashboard, go to Charitable > Campaigns. Click on “Add Legacy”.
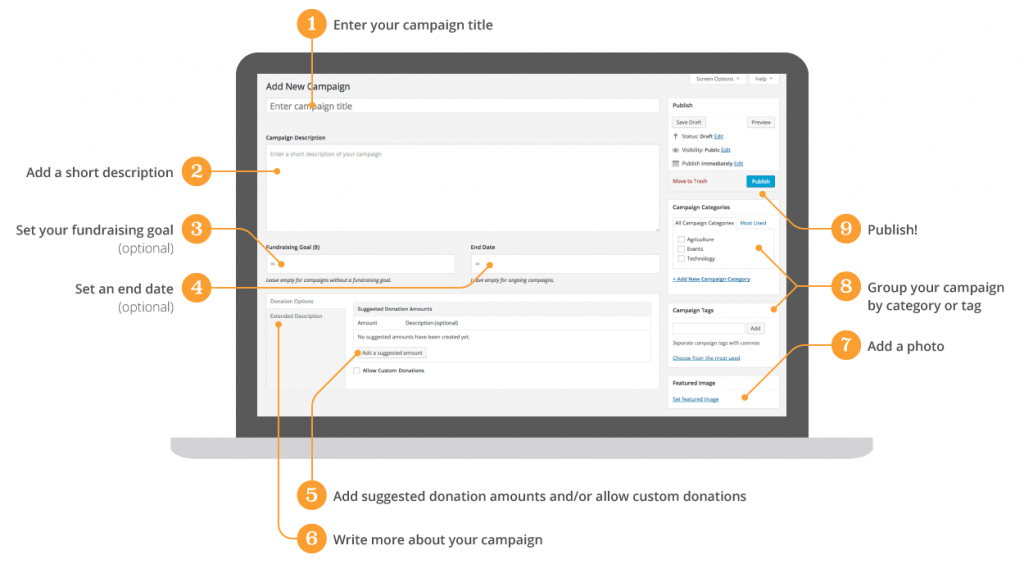
- Enter your campaign title. Try something action-oriented or catchy; your goal is to attract people’s attention.
- Add a short description. Aim for something short but sweet that clearly communicates the purpose of your campaign.
- If you have a specific fundraising target, you can add a fundraising goal.
- If your campaign needs to end on a certain date, you can set an end date. Leave this blank for ongoing fundraising campaigns.
- Next, scroll down to the Donation Options area. Here, you can add suggested donation amounts and choose whether to allow custom donations, where the donor can donate any amount they choose.
- Next, click on Extended Description. Write more about your campaign or add photos.
- If you have a lot of campaigns, you can group them by category or tag with the Campaign Categories and Campaign Tags boxes on the right side of the screen.
- Finally, if you have a photo or image to go along with your campaign, you can add this using the Featured Image box.
- Now it’s a good idea to take a look at your campaign. Click the Preview button inside the Publish box to see how your campaign is looking.
- Once you are happy with your campaign, click on Publish. Your fundraising campaign is now live!

